Saturday, April 28, 2012

Hanging Bookshelf From Crib Bumper

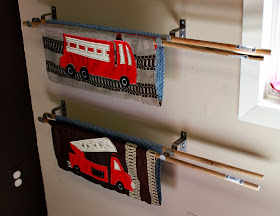
Ever wonder what to do with those crib bumpers? Now you could be like me, and use them in the crib (even though they say not to) until you feel your child is big enough not to get stuck in the crib rails. (My guy was little when he was born, so it took him a few months to catch up in size.) The other option for a crib bumper is to turn them into some cute hanging bookshelves for your wall!

I have been working on a fire truck room for Aiden for the last few months. (See post The Fire Truck Room #1.) I have been taking it slow...mainly because this pregnancy of mine won't let me do anything fast, but also to gather ideas. I looked and looked for a toddler bed set for my son's room. It turns out they don't have really any cute toddler bed bedding sets for fire trucks. There are a few out there, but I wasn't a real big fan of any of these. I like the red, white, and brown coloring of this crib set so I decided to purchase it. The quilt and the bottom sheet fit the toddler bed and I really like the window valance....but what to do with the crib bumper and diaper holder....

Now I could use the diaper holder, but I don't really like them. They seem annoying to get the diapers out of. So I cut the top off it and made it into a nice accent pillow.


Also, I have all these crib bumpers and have no idea what to do with them. Until, I ran across this picture on Pinterest:

Now I love this blogger's idea, but I didn't use her tutorial as I decided to make mine from the crib bumpers. The idea is genius and I invite you to check out her blog, especially if you want to make these from regular fabric. This is a very simple sewing machine project.

You will need a few items to get started:
Crib Bumpers
Scissors
Seam Ripper
Iron
Sewing Machine
3/4"" Wooden Dowels (2 per book pocket)
Dowel Decorative End Caps (2 per dowel)
Double Curtain Rod Brackets (2 per book pocket)
50 Pound Wall Anchors (2 per curtain bracket)
Spray Paint 
Wood Glue
Hammer
Phillips Screw Driver
Saw  to cut dowels down to size (I used our miter saw)

To start, layout your bumpers and decide if you want to use parts or all of them. 

I just wanted the fire truck parts, so I cut them apart and also cut the sides off the top and the edges. Leave the bottom in tact, as this is your pocket for books. Also, you will need to remove the batting on the inside. I had to remove mine at the bottom with a seam ripper. 

Once you have the batting removed, decide your desired width. I only wanted mine to be about 22" wide, so I trimmed my material down. Take an iron and iron down the edges of the book pocket to be about a 1/4" hem. This just helps with the sewing. 

Sew the hem on the sides. 

Next, you need to determine your pole pocket height. Place the wooden dowel on the material and fold the material over it. 


Measure were the pole pocket should end and mark it. I had 3" pole pockets for a 3/4" wooden dowel.

Use your iron again to press where you will have your sew pocket. It's also a good idea to put the dowel back in at this point to make sure it will fit with a hem line. 

Sew the wooden dowel pocket. 

Place your wooden dowels in all the pockets to make sure they fit. 

Next hang the brackets to see how much  to cut off the wooden dowels. Hang your curtain brackets using  50 pound wall anchors. The ones that come with the curtain rods are not strong enough to hold books. These are very simple to use. Hammer it in the wall until you hit the threads of the anchor and  then use a screw driver to make it flush with the wall. 

Install your window curtain brackets. 

Hang up your book pockets and determine how long you would like the dowels to be.

Measure you cut line and then cut the dowels down to size. (I used our miter saw but a hand saw would work too.)

Place the end caps on the wooden dowels. You can glue one end of the caps on, but need to wait on the other end so that you can slip them into your book pocket. 

Now if you don't like the color of your brackets and dowels, you will need to spray paint them. I wanted mine white to match my shelves above. Spray the brackets, dowels, end caps, and screws for the brackets. 

Once all the dowels and brackets are dry, rehang the book pocket on the wall. Place the final end cap on the end of the dowels. (You can glue them, but if you need to take the pocket off it will be very difficult.) 

Finally, you are finished with the hanging bookshelf and have a super cute and decorative way to display your child's books and use those crib bumpers! 


Like this post?


Wednesday, April 25, 2012

Homemade Diaper Cream

If you can't tell, I am a busy person and blogging is really the last thing on my list of things to do. Childcare provider by day and hairstylist by night, ends up making me one busy woman! Not to mention I have two kids in elementary school and you wouldn't believe the amount of homework they have! Anyways, Beth came to visit my house this last weekend and I was sharing with her my recipe for homemade diaper cream. While running a daycare for the last 8 years, I have seen my fair share of diaper rash and it's not pretty.

I have found a few things help get rid of that nasty diaper rash.

1. Less fruit- Acidic fruit just adds to the problem.
2. Name Brand Diapers- Everyone hates to hear this, but with my experience Pampers, Huggies, and sometimes Luvs have been the best diapers at keeping moisture away from the skin, which is one of the causes of that diaper rash not clearing up. Sometimes it's worth the little extra money for less diaper rash and no leaks. 
3. Good Diaper Cream- The best brand I have found for diaper rash is Boudreaux's Butt Paste.

Until a parent of mine shared this recipe with me. I am telling you, it's a lifesaver! It works the best out of all the brands I have tried and costs way less then buying those tubes at the store. 

Here's how you make it:
Ingredients:
2 ounce Vaseline Creamy
1/2 ounce Lotrimin AF Jock Itch Antifungal Cream
1/2 ounce Bacitracin Ointment
1 ounce Maalox (no flavor)
Cornstarch

1. In a small bowl, using a fork, mix the ingredients (except for the cornstarch) together. 
2. When mixed well, slowly add in the cornstarch. Mash with a fork until a paste has been formed. 
3. Store in tight container with a lid. 

Soon you will have a happy baby (like below) without all the crying, whining, and pain that comes with that nasty diaper rash!


~Luci

Monday, April 23, 2012

Butter Chicken

I was inspired to make this for dinner tonight from my cousin's facebook post. Sometimes you forget how good Indian food is!! I originally found this Butter Chicken recipe from foodnetwork.com, but I thought it might turn out to be too tomatoey tasting, so of course I adapted it to my liking!

Ingredients:
1 tablespoon of vegetable oil
1 pound of chicken, cubed into 1 inch pieces
3 tablespoons butter
1 large onion, chopped
2 tablespoons minced garlic
2 teaspoons minced ginger
1 tablespoon garam masala
1 1/2 teaspoons ground ginger
1 teaspoon ground cinnamon
1 teaspoon cayenne
1 tablespoon tomato paste
2 (8-ounce) cans tomato sauce
1 (14 1/2-ounce) can petite diced tomatoes in juice
1/4 Greek yogurt
3/4 cup heavy whipping cream
1 teaspoon of sugar (optional)
Hot basmati rice, for serving
Pita bread (or if you have time, make my Naan recipe)

1. In large skillet heat vegetable oil until hot. Cut chicken into cubes while this is heating up.
2. Cook chicken in oil until no longer pink in the middle of the largest pieces, about 10 minutes.
3. Remove chicken and keep warm in a bowl.
4. Melt the butter in a same skillet used for chicken over medium heat. Add the onion and cook until brown, about 7 minutes.
5. Add the garlic and minced ginger and cook for 1 minute.
6. Add in spices and tomato paste and cook for 1 minute.
7. Pour in diced tomatoes, tomato sauce, and the cooked chicken that has been set aside. Cover skillet and cook on low for 15 minutes.
8. Stir in yogurt and whipping cream. Reduce heat to very low and let simmer for 10 minutes. Stir often to prevent scorching.
9. Taste the sauce and see if you need to add the sugar. I usually add it if the tomatoes are too acidic. (As a side note, I did not have plain Greek yogurt, only strawberry Chobani. I just scooped the unmixed yogurt off the top and did not need to add any sugar. It gave a nice slight fruity flavor to the sauce, but not noticeable unless I pointed it out.)
10. Serve sauce over basmati rice and bread on the side.

Enjoy!!

Like this post?
Pin It

Wednesday, April 18, 2012

Confession Time: Eat In Front Of The TV

Ok, confession time.... Since as long as I can remember, my husband eat in front of our TV. I know, not the most horrible thing in the world, but really it is a bad habit. Many studies have shown that you eat way more food than needed while eating in front of the TV, not to mention it’s a bad habit to start with your kids.

It all started for us in college. Neither of us lived in a place where there was room for a table. Sitting in front of the TV was the only option and it was just an easy break from school. When we finally purchased our first house it had an eating area. We said we would quit eating in front of the TV and use the dining room….and we didn’t. Then we purchased a couch set that the center area has a cushion instead of a coffee table and we said “We won’t eat on the new couch, it’s too hard with the cushion, we don’t want to ruin it....” But, of course we didn’t quit eating in front of the TV.  I picked up some trays at the store and we crowded all of our plates, glasses, silverware on them and ate in front of the TV.  When we found out we were going to have Aiden, we said we would quit eating in front of the TV because it is a bad habit to teach him....and we didn't. Instead, we placed his high chair right next to us in front of the TV.

When we have visitors, we move the highchair back into the dining room and pretend we are a normal people and eat at our table. Our table for the last year and half has always served as a dumping ground for anything we don’t want Aiden to get a hold of. It honestly is embarrassing.

Last week, my husband finally said to me, “I think we need to just pick a date and we have to eat at the dining table from here on out.” I am not going to lie, I love eating in front of the TV. It’s a nice break for me, because as everyone knows with a toddler, watching TV is very hard to do with one around. When he is preoccupied with his dinner, I usually can watch one show.

The thing that is sick about most of this is, we don’t watch very much TV. We really don’t.  We mainly just watch TV while eating dinner and some nights after Aiden goes to bed for an hour or so.  People always ask me how I get so many projects done around the house, work and have time to blog and the honest answer is, we don’t watch very much TV.  So the whole being bummed about moving to the dining room table really doesn’t make much sense.

Anyways, we made the move last week to the table and I can honestly say, I don’t miss the TV watching time. I noticed a few things last night while having dinner at the table.

1. It’s Easier- Balancing plates, milks, silverware, glasses, condiments on two tiny trays on our cushion ottoman was pretty uncomfortable. The last thing I wanted to do is have to upgrade to something like this:

Now I can bring all of that to the table and not really worry about it spilling all over my couch.

Eating Better- My son is mimicking us more while eating, which has made him a better eater. He is using his silverware better, trying all the foods, and wanting to please us by eating all of his dinner. Before the TV distracted us and him, but now we all pay attention more to what he eats and how he is eating it.
source

Prayer- We say our daily prayer for a meal each night and it is very fun to see how Aiden really gets excited to hear it. I think it’s because we are all saying it at the same time that he finds very interesting, but before he would  just sit there and casually look at the TV while we say it.
(Gotta say I picked this photo because it reminds me of my Grandparent's house.)

My husband and I talk more- We have a pretty good marriage, I mean we talk all the time, but the silent meals are no longer. We like to talk about our day or what projects we need to get done around the house. It has just made meals more pleasant.

Birds & Butterflies- We have a large window right by our dining table and we now can watch the birds while we eat. Yesterday we saw two butterflies almost wrestling with each other mid-air. Now I know this sounds almost like watching TV, but the birds don’t stay very long and the butterflies are fast!

The only downside to eating at the dinner table has been the number of times I have had to wash my tablecloth. I guess we are not the cleanest eaters and I probably need to invest in a vinyl tablecloth, but I honestly haven't found a cute one.
I guess the moral of this post is, Eat At Your Table (and not coffee table), if you don’t already. With more than 33% of American eating in front of TV (and I think that number is low because I am sure many people, like us, like to pretend they don’t) I am glad to say that we are not one of them now. It’s been a very positive change for our family and really brought a special moment in our day to look forward to. I imagine as our kids get older, dinner time will become the most important time and the best way to make room in our busy schedule to connect with them.


Like this post?
Pin It

Tuesday, April 17, 2012

Chicken with Grapes, Thyme, and Wild Rice in a Chardonnay Sauce

The other day it was raining, so instead of doing our normal grilling I decided to use up what I had in the fridge. Namely chicken, grapes, and some old Chardonnay from a previous recipe. (Yep, my husband barely drinks wine, so if I can't we can keep a bottle for months!)

Now grapes and chicken sound a little strange, but the sweetness in the grapes and the flavor of the thyme really bring a nice flavor to the chicken. At 383 calories per serving it's healthy for you too!

For the recipe you will need:

1 1/2 cups wild rice blend
rice cooker
3 tablespoon olive oil
1 1/2 pounds of chicken breasts
1/2 of a small purple onion, chopped 
1 tablespoon of garlic, minced
1 cup of seedless grapes
1 cups of a dry Chardonnay
dried thyme (I think fresh would be better, but I only had dried on hand)
salt and pepper 

To start, make your wild rice. I love my rice cooker. You can make it on the stove, but I just love I can pour  all the ingredients in and walk away. I used 1 1/2 cups of rice and 3 cups of water. Make sure you do this first because wild rice usually takes about 30 minutes to cook. 


Season up your chicken well! Very well. This dish has light flavors and you really need to have the salt and pepper bring them out. 

In a large pan, heat 1 tablespoon of olive oil till very hot and place your chicken in the pan. 

Brown both sides of the chicken but don't cook them all the way through. 

Once both sides are browned, remove from pan. Place on a plate and keep them warm by covering them with a lid. 

In the same pan, heat the rest of the olive oil until hot. Add your purple onion and cook until caramelized. About 5-8 minutes. 

When the onions are nice and browned, add the garlic and cook for an extra 2 minutes. 

You should end up with a nice mixture of browned onion and garlic that looks like this:

Next, deglaze your pan with the chardonnay. I just poured it out of the bottle, but I think it was around a cup. 

Add your chicken back in bring mixture to a boil. 

Once boiling, reduce to low and add in your grapes. 

Sprinkle with thyme. I used a lot, probably a tablespoon. Cover and let simmer on low for 15-20 until chicken is cooked through. 

When you open your pan you will see many of the grapes have split open and lost their color a little. This is good, the split grapes add sweetness to the sauce!

Plate up your chicken on a bed of wild rice. Cover with onions, grapes, and some chardonnay sauce. 
Enjoy!!

The skinny: Serves 6 @ 383 calories


Like this post?
Pin It