Friday, November 30, 2012

DIY: Hidden Storage Wall Cubby

A few months ago, I wrote a blog about my Paint Only Remodels of our Main Bathroom. Now I have talked about this about a million times before, but if you missed it-- I am only allowed to remodel this house using paint. We plan on building a new house on this land in a few years, so my husband doesn't want me to waste money on something we will eventually bulldoze. (You can read more about it on the blog above.)

Part of the issue with our bathroom is storage. We have three drawers and two cupboards...which are all a perfect height for a toddler to get into and unpack every day while getting ready. It's very annoying. We have tried drawer hooks, but he still gets into them. I set out to create another storage unit on the wall, but we really didn't  have room for another medicine cabinet, so I came up with this idea for Storage Wall Cubbies. A few months ago I created these fake paintings and wrote a little DIY Faking a Painting.

I thought they would be great to use as a cover to a wall cubby! A great way to hide the clutter and add some art to the wall. Here is my little DIY on how I created these Hidden Storage Wall Cubbies

To start you need to create two 10"x10" Storage Wall Cubbies:
1'x4'x7' Pine Boards
2' square of 1/4" plywood
Nailgun (or hammer and small nails)
Miter Saw
Table Saw
Wood Glue
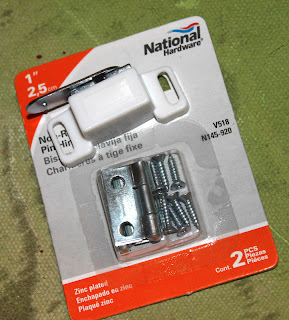
4 small hinges
2 cabinet magnet catches

First cut your 1'x4'x6' pine board into 8 pieces that are 10" long with a 45 degree angle on each piece:

Each cubby will need 4 boards that look like below. I like to line them up to make sure they are all the exact same size.

With the boards above, you will assemble your wall cubby. I started with gluing the boards together to make a square.

You will end up with a square like below. (Use can use a L-square ruler to make sure it is square.)

Using an nail gun (or just a hammer and nails) reinforce the box in each corner.

Measure the outside of your cubby box and cut the 2' square of 1/4" plywood into two pieces to be the back of your cubby box. My cubbies are 10"x10" so I cut the plywood to be a 10"x10" square.

Attach the back using a nail gun (or hammer and nails) to create more support to the box. 

You now have a finished wall cubby (or two in my case!)

Now we need to sand and paint it to look professional :) Most likely, you will have some sort of a little gap where the boards meet. Use some wood fill to fill this gap.

Let it dry overnight.

Then sand it with 60 grit, 100 grit, and then 200 grit.

Paint the box your desired color. My frames on my fake paintings are brown, so I matched the color for the cubbies. 

After two coats and a day of drying you should have two wall cubbies that look like this:

Next, install the hinges. Measure two inches from the top and bottom on the frame of your fake paintings.


Install the hinges and you will have a frame that looks like this:

Next, on the cubbies mark where the hinges of the fake painting will meet cubbie. Make sure you give them enough room to close and line up on the cubby straight.

Drill holes in the cubby for the hinges and then screw the hinges in place. 

Now to attach the magnetic catches. These will make sure the frame on the front will stay closed.

Measure two inches to the inside of the cubbies.

Install the magnetic catches. 

On the frame of the fake paintings, install the metal plate for the magnetic catches.


You should end up with some finished Hidden Storage Wall Cubbies that look like this.


Install them on the wall, preferable in a stud so they can handle weight of whatever you put in them. Once installed you have a couple of Hidden Storage Wall Cubbies that hide all your junk you don't want people to see and 

add a little wall decoration to the bathroom at the same time!


Like this post?

Thursday, November 22, 2012

Thanksgiving Warm Fuzzies

Well I did it!  I made my first Thanksgiving dinner!  Truth be told I wasn't very nervous because my Mom was there in case I had any questions.  But everything turned out fabulously and was quite delicious (if I do say so myself).


Of course, in the midst of delicious food and the clatter of silverware, I couldn't help but look around and feel so incredibly thankful.  It was just a small gathering, hubby, my parents, and myself.  Still, I was surrounded by three people who have had a profound impact on my life.

My parents continue to inspire me with their wisdom, faith and generosity.  I hope I am half as amazing as they are when I have my own children.

~~~

And my husband.  He inspires me daily with his kind heart and genuine spirit.  It is such a gift to be married to such an amazing, faith-filled man.  How did I get so lucky?


I hope you all had a wonderful time celebrating with your loved ones.  It is a beautiful life that God gives us and we have so much to be thankful for.

Happy Thanksgiving.


~Christi


Wednesday, November 21, 2012

Printable Toy Car Road Map

Tomorrow is Thanksgiving Day and for many families that means traveling to see relatives. We now have a two year old and a two month old so I am anticipating our five hour road trip might not be the most enjoyable experience for any of us, but it is totally worth it to see family! I have been racking my brain with ideas to keep my toddler busy on this drive!

The other day, I purchased this great car seat tray from a friend of mine for Aiden to play on while on the trip:

I already have crayons and coloring books packed, but I was trying to think of some more fun toys he can use on this tray. The picture shows toy cars, and seeing this I came up with a great idea! A small Toy Car Road Map!

I looked all over online to see if someone had one of these available that I could just print off, but the search resulted in nothing :(

That is when I decided to use my skills as a graphic designer! I found some free map elements online and created my own little road map for Aiden to play with online.

I printed them on two 8.5"x11" sheets of photo paper...but really any paper will work. I wanted a little weight to the paper and I am out of white card stock, so photo paper was my next option. 

Next I put them in a sheet protector, back to back. The tray isn't big enough to have them side by side, so he can flip this over and change the map if he likes. Also, the sheet protector will hopefully protect it from spills and food in the car.

 The size is just perfect for the map! There is also space on the side to store extra cars.

As I am writing this blog and taking pictures, Aiden can't help himself to play with the map as I am doing so :) Hopefully, he will feel the same way in the car tomorrow! 

Here are the road maps up close:


If you would like your own road map, you can click on the pictures above and download the pdf. In case there are other graphic designers out there, I left the pdf to be editable in illustrator if you would like to move the buildings and roads around. 

Happy Thanksgiving and safe travels!!!


Like this post?

Monday, November 19, 2012

Mom's Sweet Potato Casserole

Yesterday I received a call from my sister Luci requesting my husband's mother's Sweet Potato Casserole Recipe. She said, "I looked for it on the blog, but I couldn't find it." That is when I realized I have never posted this very popular dish of my husband's family. In fact, my husband says every year how this dish is his favorite of all the Thanksgiving dishes. This dish has been liked by so many, that I have given out the recipe too many times to count (hopefully it's not a secret family recipe!) The dish can be made the night before for easy baking. I hope you enjoy it as much as we do! (I will try to take a picture of the casserole myself this Thanksgiving, until then here's one I found online that looks similar.)


8 medium sweet potatoes or 8 medium yams
3/4 cup butter (1 1/2 stick melted)
1/3 cup evaporated milk
2 eggs
1 teaspoon vanilla
1/2 cup pecans
1/2 cup brown sugar
1 cup flour

1. Boil sweet potatoes or yams till soft. Mash together.
2. Mix mashed potatoes, 1/2 cup melted butter, evaporated milk, eggs and vanilla. Mix together and beat well.
3. Pour into a 9 x 13 pan.
4. Now make the topping. Mix brown sugar, flour, and pecans together.
5. Mix in remaining cup of melted butter (about 1/4 cup). Mix well.
6. Pour topping on top of potatoes.
7. Bake 40-50 minutes at 350 degrees.


Like this post?

Tuesday, November 13, 2012

Tuesday Questionnaire


I snagged this survey from one of my favorite beauty gurus Amarixe.  I figured, why not?  Feel free to copy and fill it out yourself.  How is your week going so far? 

1.) Mood:

Tired and a bit lethargic.  Not my normal chipper self!  Happy thought?  Thanksgiving is next week!
(Mmm stuffing)


2.) What is the last song/album you purchased?
Taylor Swift's Red.  It is amaaaaaaaaaazing :)  I'm particularly fond of #9 (it's just happy!), #12, #13, #14 and of course my favorite from the whole album, #16 :)  What can I say, that girl knows how to write!  


3.) The best video game system ever is __________.
Erm... not a gamer.  The last time I played video games loyally I was quite young so probably the Sega Genesis :)  I played Sonic & X-Men quite a bit.


4.) Current nail polish:
Revlon Mistletoe.  It's a beautiful dark green.  The green/gold sheen is very subtle.  It reminds me a lot of OPI's lucerne-tainly look marvelous but in green.


5.) How many times did you hit the snooze button this morning? 
Honestly way too many... I need to utilize that app I downloaded that forces me to do math problems in order to snooze.  But seriously, I have a snooze button problem.  


6.) Current outfit:
Pink, plaid jammies and a t-shirt. It's almost bed time!  


7.) What is the furthest distance you've ever driven?
On my own, completely by myself?  Just to the Twin Cities and back.  I'm a road wimp and hate driving :)  


8.) You can only use one mascara for the rest of your life-- which one is it?!
Ooh this is tough!  I guess I would have to go with Maybelline The Falsies.  It's not my favorite for bottom lashes but I love it for dramatic upper lashes.  I mentioned it in my favorite drugstore staples post here.


9.) If you could have a $1000 gift card to anywhere right now, where would you choose?
Hmm I would probably choose a place like Home Goods or some other home decor place.  We are (most likely) going to begin building our first home in the next few months so my mind is more focused on that kind of stuff right now :)


(Photo Source)


10.) Weekly Goals:
Ooh I need to finish making my list for Thanksgiving dinner (I'm in charge of it this year - eek!).  I also need to continue my current organization project. My next area to tackle for this is probably my overflowing jewelry armoire :)  


~Christi

Like This?- Pin It!

 
Copyright 2009 between3sisters