Also, not to mention that the deck is super unsafe-- if you can't tell by just looking at it. I shouldn't say it's super unsafe. I have walked on it and so has my husband. I just think if you would get a few people on it and some patio furniture I would question the structural support. Obviously the rails aren't up to code either...well I guess they are code because we live in the country and anything goes! This deck comes off the master bedroom and we decided when we bought this house not to use the deck and we are not replacing it. (We are not replacing it because we plan to bulldoze this house in a few years, see this post for more details Our New House.)
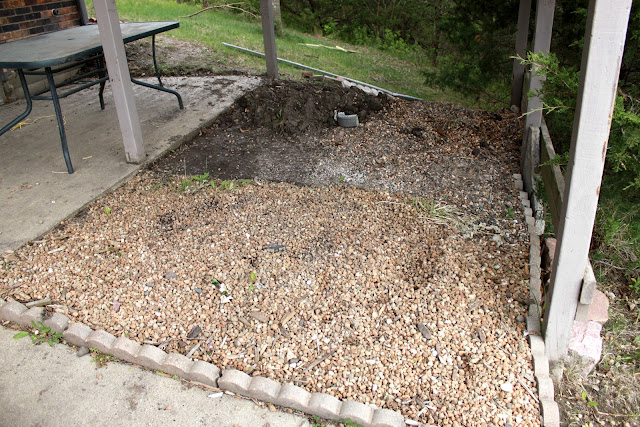
Enough about the deck...the nice feature of this deck is the shade it provides and that the location is right next to the garden area. The previous owner of the house had a hot tub down here, which we don't plan on buying. However, after watching my son play around the yard I thought the area would make a great place for a sandbox and playground AND use the deck to provide some shade. This probably isn't an idea that most homeowners would be interested in, but I have seen a few other houses around my town where they have installed a swing set under their deck. If you have two decks like us, this might be a good option for you.
Here is an up close of the area under the deck. The rock area will stay rock, after removing some hostas, and the dirt area (the old hot tub area) will be where the sand box will go.
I decided to make the walls higher on two corners of the sandbox because on one side of the area there is a good drop off. The back and left side of the sandbox will have the higher walls. I don't want any crazy toddlers (Aiden) jumping out the wrong side and falling down a hill. On the other two sides, I wanted some seating for my husband and I if we wanted to play in the sandbox with him.
My first task was to build up the sides of the wall on the sandbox. I used the deck supports to attach the sides of the sandbox. Now some of the deck supports aren't very close together. To provide support for the walls I hammered wooden stakes into the ground and drilled the sides of the wall to them.
For the seat support, I made an angled support and positioned them every few feet, which should be enough to support the average adult.
Here's a close-up of the support if you are wanting to build something like this. You will have to use your math skillz, which I am not ashamed to say my husband helped me out with--he was a math major after all. The embarrassing part is that it uses the very basic algebra equation...if I can't remember algebra I wonder how bad my calculus is! To find the length of the angled board, we just used the pythagorean theorem
Here is the completed sandbox with the seat for sitting on the two sides. Once I had the sandbox built, I stained the boards with a stain that prevented chemicals from leaching out of the green treated lumber. Not all stains do this, so ask your hardware person which brands seal in the chemicals.
I filled the sandbox with some dirt to even out the area and then placed landscape fabric in it to prevent the weeds from coming up through the box. (Or in our case Sumac.)
I also installed some playground toys, a swing, and moved our small playground we had inside the house to the outside. The playground area was complete!
He loves banging on these drums I installed and they were a great way to utilize the taller wall on the two sides. (Now you might notice the black fabric is showing. I need to add more sand to the sandbox, but waiting to see how much the husband needs for his firepit/patio he is building. All the leftover will fill the sand box a few more inches.)
Now he plays in the sandbox every time I am working in the garden, which seems like a lot! You should see my horrible tan lines!
On the size with the swing and slide, I had to remove the hostas, remove the rocks, lay new landscape fabric and then put the rocks back.
Even though the deck is an eyesore, I really like the playground area. It was a great way for us to use the useless deck as a large shaded area. As I said before, I can be in the garden and Aiden can play in the sand. As you can tell from the picture below, our garden is growing! The only thing that I don't like is that it seems to be bath night every night now every time Aiden plays in that sandbox!
Also, another item checked off my Countdown of Summer Projects is complete!!
If you have great eyesight, you might have noticed the lumber sitting on the table in the photo above. That's for the next outdoor project, our broken fishing bench! It's a really funny story how it broke, but that will be for a later post. It use to look like this:
Now it looks like this:
Thank goodness I found there other bench you see above there at a garage sale last year for cheap or we would have no seating down by the water. I honestly just plan on rebuilding the same one, just more structurally sound.

Like this post?


1 comment:
Hi! Just curious where you got those neat sand funnels & toys attached to the side of the sandbox?
Post a Comment