Friday, August 31, 2012

Make Ahead Meals: Meatball Meals

I am starting a series of blogs for Make Ahead Meals that I am preparing before Baby 2.0 arrives. Every night when I make dinner, I am doubling the recipe and putting the second in the freezer. I am hoping that the prepared meals will help on those totally exhausted days when cooking sounds like no fun. I am hoping many of the meals I will be preparing will be somewhat healthy and low calorie, but I know there will be some meals mixed in that aren't. To prepare for the freezer meals, I purchased some slow cooker liners (for the crockpot meals), gallon freezer bags (for the freezer skillet meals), and Aluminum Foil Steam Table Pans with matching lids (for the freezer casseroles).

We had another great sale at the local store, 93% lean ground beef, and I promptly went out and purchased 4 pounds of beef.  I knew exactly what to make with all ground beef--- MEATBALLS! Growing up, I can't remember ever having meatballs, but when I met my husband he showed me his Mom's recipe and I have been making them ever since. I know they freeze well, so I thought they would make a great freezer meal!

I started off with:
4-pounds of 93% lean ground beef
4 onions, chopped small
8 slices low-calorie bread, crumbled
4 eggs, beaten
4 teaspoon Italian Seasoning 

Directions: 
1. Preheat the oven to 400 degrees F.
2. Combine all ingredients in a bowl and mix with hands. 
3. Form into balls and place on two cookie sheets. 

4. Bake for 20 minutes or until golden and cooked through.

The Meals I Made:
I divided the meatballs into 4 freezer bags. Two of the bags I just stored in the freezer. It's always easy to keep spaghetti sauce on hand, heat it up, and throw the meatballs in for a quick meal.

The other two bags I used to make Sweet & Tangy Meatballs from OnceAMonthMom.com.

Here are the ingredients you will need:

Sweet & Tangy Meatballs
2 pounds of meatballs (see above for recipe)
5 cups canned pineapple chunks, juice reserved
6 cups sliced carrots
3 large chopped onion
2 teaspoon minced garlic
3 cups reserved pineapple juice, plus water
12 Tablespoons vinegar
12 Tablespoons brown sugar
8 Tablespoons soy sauce
4 Tablespoons cornstarch

And you can see the complete recipe here at her website: Sweet & Tangy Meatballs

I doubled her recipe and made one for dinner that night and one for the freezer.

I mixed up all the sauce ingredients as she directed in her recipe:

I then removed half of the sauce mixture and put half of the meatballs in the skillet to warm them up and served it over rice for dinner. 

The sauce I removed from the pan, I poured over the meatballs in the freezer bag and labeled them.

I can tell you, this recipe is a keeper! It was really good and my toddler loved it! Next time though I would make the meatballs out of ground turkey just to cut the calories a little! 

Meals to date:
2 x Spaghetti and Meatballs (really just frozen meatball)
1 x Sweet & Tangy Meatballs


Like this post?

Tuesday, August 28, 2012

DIY: Building Furniture Side Bookshelves

This is sort of a continuing to my previous blog of the Garage Sale Redo: The Ikea Trofast Shelf. Last week I picked up this Ikea Trofast storage unit at a garage sale for $5!

I had an idea, let's just throw this on top of the current toy box and use it for the extra storage. However, when I put it on top, I didn't like how the width did not match the toy box width below. 

I came across this photo on pinterest and thought it was a great idea to add to the sides to make the width match!

Here is my little DIY on how you can add these shelves to really any furniture you have around your house, whether it's an Ikea Trofast shelf, dresser, nightstand...whatever you can think of:

You will need:
Pencil
Tape Measure
Jigsaw
Miter Saw
Countersinking Bit
Wooden Plugs
Sand Paper
Drill
Screws
Nail Gun
Wood Fill
1'x6" boards (length determined by your width of furniture and number of shelves)
Trim boards for the front or 1"x2" boards (length determined by your width of furniture and number of shelves)

Now this DIY will take some calculations on your own. You will need 1"x6" boards, but the length of the boards will be determined by your number of shelves you would like. 

For one shelf you would need:
2 pieces cut 6" Tall
1 piece cut the width of the side of your furniture

When it comes to the trim boards for the front, you can use whatever you want (as long as less than 1" thick.) You just need to buy the length needed to cover the front of the shelves. 

The Steps:
I wanted three shelves, 2 on one side and one on the other.

I cut the sides of my shelf using a miter saw. I made 6 pieces that are 6" tall. 

Next to add some decoration, I wanted to put a curve in my sides using a jigsaw. I measured a mark on one side at 2 inches and 4 inches on the other corner.

Using a paint can, I traced a curve between the two marks.  

Here is my path that the jigsaw will follow.

Cut the 1"x6" boards to the width needed for your furniture. 

Using your miter saw, cut the curve on the sides of your shelves. (This was my first time ever using a jigsaw. I saw it in the box and decided to give it a try. At one point I was having a hard time getting it to cut and I STUPIDLY, stuck my hand under the board! Luckily with my cat-like reflexes I escaped cutting the tip of my finger off and just cut the side pretty deep. It's a lesson why not to do woodworking when you are tired from being 35 weeks pregnant. Turns out it wasn't cutting well because I had hit a knot in the wood.)

You should end up with the sides looking like this: 

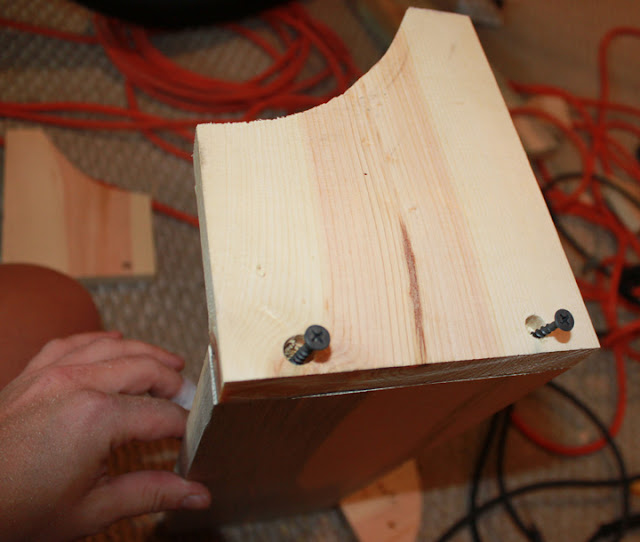
 Now you will assemble the shelves. Make marks on the side pieces 1 inch from the edges.

Using a countersinking bit, drill your holes.

Attach your sides to your bottom shelf with screws.

 Here are two of my almost built shelves:

Using your wood plugs, fill your holes where you countersunk the screws.  

Now you want to work on your front of the shelves. Measure the width of your shelf and choose what substrate you would like to be on the front.

 I had some old 1" trim so I decided to use it up on this project. I cut three pieces of the trim to the proper width for each shelf.

Using a nail gun, I attached the trim to the front of my shelves.

I turned out cute, but the trim is so thin that the nail gun cracked a few of the ends. Hindsight, I should have used finishing nails and a hammer.

No biggy-- I just covered up the cracks with wood fill and filled the nail holes.

When your shelves are built, sand down all your pieces.

Attach the shelves to your furniture. In my case it was the Trofast shelf. Attach them from the inside of the furniture out so you can't see the screw heads. Make sure they are level!

It was easier for me to turn my unit on the side to attach them. 

And here is the final product with the shelves....now just to paint and continue on the previous post of Garage Sale Redo: The Ikea Trofast Shelf


Like this post?


Sunday, August 26, 2012

Easy to Peel Hard Boiled Eggs

Over the years my Mom perfected the art of making easy to peel, hard boiled eggs. There are SO many theories out there (I've tried many that haven't worked) and my mom always defaults to the following tried and true method:

So if you would like to avoid eggs like this:


Read on!

First: place eggs in a pot and cover with the coldest water possible. Then, set the pot on the stove and crank it up so the water will boil.


Once the water gets to a FULL rolling boil, 
time it for 10 minutes exactly.

...

do, dee, do, dee, do, dee, dooooo.
do, dee, do, dee, DO, da da da da da...


After 10 minutes of waiting, immediately remove the eggs and 
let them sit for 5 minutes.


Okay so after all that waiting, pour the hot water out and then cover the eggs with cold water in the sink.


Next, take the eggs out and roll them around a bit on the counter or sides of the sink to get most of the outsides cracked. Then place back in the water as you move to the other eggs.


Once the eggshells have all been cracked,
pull them out and start peeling!


You will be AMAZED at how easy most of the shell comes off.  There is still a little bit of shell picking here and there, but for the most part it is awesome how easily it comes off.


And voilà!


I love hard boiled eggs as a quick breakfast for work.  Or if my sandwich or salad for lunch is a little boring I slice one up and add it.  Eggs are totally delicious and a great source of protein.

Thanks for reading and I hope this tip from Mom saves you some frustration the next time you make hard boiled eggs!


~Christi


Saturday, August 25, 2012

Garage Sale Redo: The Ikea Trofast Shelf Part 1

It is sort of a heartbreaking day when you realize that your kids toys are taking over your house. When you finally move into a home, you dream of the perfect living room. In my old house, I had the perfect living room---organized, cozy, beautiful:

Of course this picture was before kids and we have moved since then. Our new house (which it is anything but new, try 1970s house) has a horrible layout. I have no place for toy storage, so the living room had to be sacrificed to be both the living room and the toy room. There goes my dream of the perfect living room! 

I decided a few months ago that rather than to fight this battle, I would try to combat it by providing some sort of storage option for the toys. Months ago I built this handy little open toy box  and it has been a lifesaver!

Unfortunately, due to a few awesome deals of Little People and Legos, we are running out of room in the toy box already. 

I have always had plans to add a top unit to this toy box when this time came, something much like this:

However, I haven't had the time or the energy (4 weeks till Baby 2.0 is here!)  One day I came across an Ikea Trofast storage unit at a garage sale for $5!

I had an idea, let's just throw this on top of the current toy box and use it for the extra storage I was going to build. 

However, when I got home and put it on top of the unit, it looked a little funny.

I think it looks funny because it doesn't match the width of the toy box and the stair-stepped shelving makes it look strange. So I set off to correct the issues and hopefully end up with something that looks like it's a one piece unit.  

I came across this photo on pinterest and thought it was a great idea to add to the sides to make the width match!

Anyways, that is my plan. I can't wait to show you the results, but first I will give a little DIY on how to build these side shelves...that you could add to your own Trofast shelf, dresser, or whatever else you can imagine!


Like this post?


Thursday, August 23, 2012

Make Ahead Meal: 8 lbs of Pork Loin = 4 Dinners

I am starting a series of blogs for Make Ahead Meals that I am preparing before Baby 2.0 arrives. Every night when I make dinner, I am doubling the recipe and putting the second in the freezer. I am hoping that the prepared meals will help on those totally exhausted days when cooking sounds like no fun. I am hoping many of the meals I will be preparing will be somewhat healthy and low calorie, but I know there will be some meals mixed in that aren't. To prepare for the freezer meals, I purchased some slow cooker liners (for the crockpot meals), gallon freezer bags (for the freezer skillet meals), and Aluminum Foil Steam Table Pans with matching lids (for the freezer casseroles).

8 lbs of Pork Loin = 4 Dinners
I have been at it again, slowly but surely making some meals for when baby 2.0 arrives. I honestly am not much of a pork eatin' kind of girl, but when I saw boneless pork loin on sale at my local grocery store for super cheap ($1.99/lb) I decided to turn it into some crockpot meals for the deep freezer. They only offered the pork loin in huge packages, so I threw an 8 pound chunk of the meat into my cart and made my way up to the checkout. 

I ended up making four meals out of the 8 pound of pork loin. In all, I made three recipes, but one of them I made twice because it sounded so good (and it was!)

Curried Pork Loin (2x)
Honey Orange Pork Loin
BBQ Pulling Pork Loin

To start, trim up your pork loin. I hate a fatty piece of meat and as much as good chefs say it adds flavor, I don't like it.... especially in my crockpot. I find whatever sauce you have in there ends up being super greasy, so I am a fan of trimming off the fat. (Looks yummy doesn't it!)

Since I had 8 pounds of pork loin and needed 2 pounds of loin for each recipe, I cut the big chunk of meat into 4 equal parts.

Then I started assembling the ingredients: 
Curried Pork Loin
4 lbs pork loin (cut in two pieces)
2/3 cup apricot preserves
4 tsp mustard
3 tbsp curry powder
2 tsp garlic powder

1. Mix the apricot preserves, mustard, curry powder, and garlic powder all in one container.
2. In crockpot, place one piece of the pork loin.
3. In crock pot liner, place other piece of the pork loin.
4. Divide sauce evenly over the the top of both pieces of pork loin. Twisty-tie the crockpot liner bag. 

(I forgot to put this one in a crockpot liner, so it's going to be a messy clean-up!)

5. In the crockpot, cook on low for 6-8 hours.
6. For freezer bag, cover crock pot liner bag with freezer bag and freezer label the bag with the following directions:
- Thaw completely
- Place in crockpot on low for 6-8 hours
- Serve over hot brown rice.

Honey Orange Pork Loin
2 lbs pork loin
1/4 cup honey
Juice from 1 orange 
Zest from orange above
2 tablespoons olive oil
1/2 teaspoon thyme
1/2 cup chicken broth

1. Mix honey, orange juice and zest, olive oil, thyme and chicken broth together.
2. In crock pot liner, place the pork loin.
3. Cover the pork loin with marinade and twisty-tie the crockpot liner bag. 
4.  Cover crock pot liner bag with freezer bag and label the freezer bag with the following directions:
- Thaw completely
- Place in crockpot on low for 6-8 hours
- Serve with a side of quinoa 

Pulled BBQ Pork Loin
I know, I know-- I am cheating with this recipe, but pulled barbecue pork loin is super easy and can be eaten over bread. I don't always have barbecue sauce on hand so I wanted to make sure this was ready to go right away. The directions are pretty obvious:
 2 lbs pork loin
1 bottle of your fav BBQ sauce

1. In crock pot liner, place the pork loin.
2.. Cover the pork loin with BBQ sauce and Twisty-tie the crockpot liner bag. 
4.  Cover crock pot liner bag with freezer bag and label the freezer bag with the following directions:
- Thaw completely
- Place in crockpot on low for 6-8 hours
- Pull pork and serve on buns.


At the end of this very short prepping process you will end up with dinner for that night and three meals for your freezer!!


Like this post?

Like This?- Pin It!

 
Copyright 2009 between3sisters