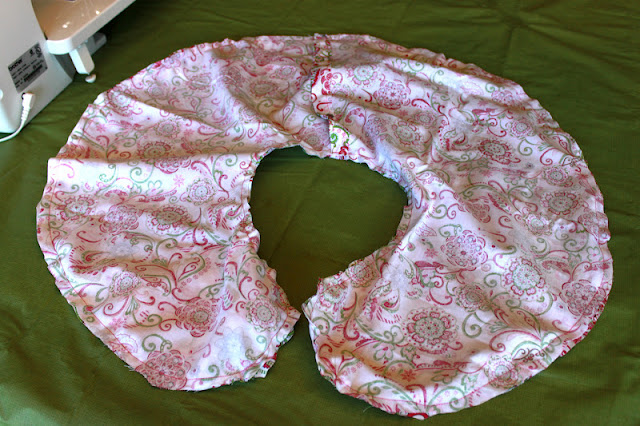
I know I promised that the next post on the nursery would be the reveal of the finished product, but I did this very short DIY yesterday and decided it would be nice to share. Really this isn't part of the nursery, more of an item I will use in the nursery. Here's the story of the super large nursing pillow:
This is not a Boppy Pillow. I have a Boppy Pillow but I let my Mom borrow it for some kids she watches during the day. Well, she was in need of another one since I will be needing mine back in 7 weeks and I ran across this nursing pillow at a garage sale for $10. It is HUGE!! About 23"x24" in size. It may not look that big in the photos, but trust me it is.
It was basically brand new, but had no cover on it. I think whoever it belonged to at first probably never had a cover so never used it. I brought it home and washed it, planning on giving it to my Mom so I could get my other pillow back. However, I decided to see if I liked this pillow better....and I did! I always thought the way my Boppy Pillow fit on me, just didn't fit with my rocking chair size. I really didn't use it that much. This thing, being really large, works great with my large rocking chair.
I decided to keep it, but needed a cover for it. I looked all over the internet for a pillow of this size and still didn't find one. It's not homemade, it has tags that it was made in Mexico but no other markings on it. I decided I needed to make the cover myself.
Now I am not a sewing expert, so this was a large task for me. I mean I made several things in high school (a dress, a blanket that folded into a pillows, stuffed animals) but honestly I have forgotten most of my sewing skills. I usually just fake it the best I can.
I started by tracing the shape of this pillow on some butcher paper to make a pattern.
I cut out the pattern and placed it on some extra material I had from the curtains.
I pinned it in place and cut out the material to be about an inch larger then the pattern. (In hindsight, I probably would have cut the material to be 2 inches larger then the pattern, but my pillow is fat!)
I don't remember how to do zippers and honestly didn't want to deal with them, so I decided to make a cover that has a sort of "pocket" that the pillow can go into. To do this I needed to cut the other side of the pillow into two pieces that for sure would overlap. For ease of following this DIY, I will call this the overlap side.
I took each piece of the overlap size and stitched the opening back 1 inch to make it appear more finished.
When done you will be left with two pieces, with a nicely sewn finished opening for the pillow:
Take your first overlap side (the side you want to show on the outside when finished) and pin it to the front side of the pillow. The colored sides of the materials should be facing each other.
Pin these two sides together. If one side happens to be slightly larger then the other, no big deal. Just make sure the edges touch and let the material gap in the center. It will help with the fluffiness of your pillow.
Sew the second overlap side on and you will end up with a cover that looks like this:
Turn the cover right side out.
That is it! The super easy nursing pillow cover that can fit any nursing pillow! It took me about 30 minutes to make this pillow cover and if you are an expert in sewing it will probably take you less time! I can't wait to use it!
Happy sewing!!

Like this post?


No comments:
Post a Comment