Tuesday, November 30, 2010

Quick & Easy Christmas Ornaments (Guest Blog)

Please welcome our first guest blogger Barb!
I have worked with Barb for several years and I can honestly say that she is one of the most creative people I have met. Each year she makes ornaments for her postman so he can hand them out to his favorite customers. She sent me pictures of this year's ornaments and I just had to ask her to write a blog about them. They are just so cute! They would make great gifts for teacher presents or a fun Christmas craft for your little elves. ~Beth


Santa Can Ornaments
About the Santa cans - I just found a picture of a similar decorated can on the internet and basically made up my own instructions.

Materials Needed
I purchased most everything from Hobby Lobby that I didn't already have at home except red enamel paint (much cheaper at hardware store)

Rinsed and dried pop cans (any flavor, but red ones might take a little less paint) for as many ornaments as desired
Red enamel spray paint ( I made 48 Santas, it took 2 cans)
Hot Glue Gun and lots of gluesticks
White acrylic paint - large tube
Small paint brushes
Small tube of flesh color paint or mix a little red and yellow into white
Glitter or other "snow" type product to mix with white paint for texture
Small Pompoms in red for noses and white for hats
Glue on Eyes - disk type found in doll crafting section
Felt for Gloves (I used black with glitter already on it) 2 sheets for 48
1/2" wide ribbon for belt ( any color or pattern you desire - I used houndstooth)
Any kind of red material for hat if you have a sewing machine otherwise purchase premade small santa hats
Any kind of white trim such as rick rack or piping for hats
Polyfiber stuffing - about a ping pong ball amount for each hat
White doll hair on a metal wire to use for beard cut into 3 inch length then bent into a "U" shape
Stick on or glue on gems for belt

Step 1
Remove tabs from cans, insert a stick or other device about the size of the opening of the can to hold can, spray sides of cans and let dry. I used a large cardboard box to help contain the overspray. - and set cans on newspaper to dry...This was the worst part of the project - my garage smelled like paint for days.
You will need to do 2 coats to cover the graphics on the cans but it's not necessary to make completely opaque.

Step 2
Mix some white paint and glitter for texture, then using a dry brush technique, dab paint mixture onto cans around the "neck" , down the front and bottom of Santa's suit. Let dry. Optional: I also took a white opaque pen and wrote "Merry Christmas 2010" on the back of the suit.

Step 3
Paint flesh tone onto entire top of can. Let Dry.

Step 4
Very carefully fold over the can slightly above the middle to create the shape of Santa. You will have some paint flake at the corners of the fold but it will be covered by the next step.

Step 5
Mix a heavier combination of glitter and white paint to dab onto the folded portion of the can to create Santa's cuffs - this should cover any cracking of the red paint. Let dry.

Step 6
Cut out felt into shape of gloves about 1" size and 2 - 2.5" strips of ribbon for belt. Hot glue the ribbon onto the can, then the gloves and finish with gems.

Step 7
Hot glue the eyes, nose and beard to create the face. Make sure to have a little of the opening show through for his "HO HO HO" mouth!

Step 8
Cut out about a 4" triangle of red material for hats, sew on white trim on one edge, then fold and stitch seam, turn inside out and hand sew white pompom to end,
stuff polyfiber inside base of hat - then hot glue the front and back to top of can. I used gold safety pins to create a hook to hang, but you could use any type of hanger.

Step 9
Enjoy giving to friends and thanks for recycling!!

Sunday, November 28, 2010

Christmas Tree Inspiration

With the advent of our marriage came the opportunity to finally decorate our very own tree. Well let's be honest, I do the decorating and Nathan observes :)

When I made my first attempt at Christmas tree trimming last year I didn't really know where to start. Growing up our family tree was always a mix of tradition. Garland, colored flashing lights and even tinsel were essential. Mom and Dad combined these items with antique bulbs, knick knacks, candy canes and ornaments created during our childhood. About every color could be found on our glittering Christmas tree. I used to love turning all the lights off and putting the tree lights on the "slow change" setting. I'd lay under the tree and watch the lights fade from one color to the next, casting shadows from the tree branches onto the ceiling. You've heard of sensory memories? Well this is one of my strongest. The colors from the lights, the smell of pine, and the sound of Christmas music. I will never forget that memory or the magic created every Christmas.

That being said, Christmas tree decorating can be quite important! Obviously our Christmas tree had a lasting effect on me and someday I hope to give our future children the same excitement. So where to start? I tend to be a traditional girl but every once in awhile I surprise myself by falling in love with something completely out of the ordinary. Here are a few inspiring pictures of Christmas trees I found while browsing the internet... I hope they bring you some inspiration as well!

Traditional: Red & Gold
Photo Source
Can this tree be anymore BEAUTIFUL?! I have to admit I am a sucker for red and gold. As I said I tend to be pretty traditional and to some it may be boring but seeing a tree like this just makes me melt. GORGEOUS! And to be honest I decided on a red and gold theme for our tree this year... surprised? Probably not.

White, Frosted Christmas Trees

If I had to pick another style to go with, something that is very unlike "me," I would pick this beautiful frosted look. I was running around Hob Lob the other day looking for stuff to decorate our mantel and stopped abruptly when I saw a kiosk filled with glittering, white decor. There is something special about the cool white look; how it reminds me of the way snow glitters when the sun hits it. If I were to deviate from a traditional tree my heart would almost surely belong to this winter wonderland-themed spruce.

Monochromatic
The monochromatic look is something I've seen recently in homes. The first tree has a beautiful gold theme throughout. I just love the way they curled the gold ribbon down from the top of the tree. I never used to like gold but the older I get the more it's growing on me.

The second tree pictured has a prominent blue them with touches of silver. Perhaps this is not entirely monochromatic but they definitely stayed in a color palette with similar hues. The look reminds me of sparkling icicles and ice skating.

The third tree fits well with the turquoise craze running rampant in fashion and homes across the world. It is definitely a more modern take on the Christmas tree. I imagine it in in a swanky Manhattan apartment or perhaps a beach home in North Carolina. To me the monochromatic look can be a sophisticated, modern option if you're tired of the traditional tree.

Whimsical & Fun
This tree has a darling "sweet tooth" theme. Christmas-themed lollipops, candy canes, and bulbs provide the proper accents for a candy-lover's tree. We all remember the famous Night Before Christmas poem and this tree, dripping with sweets, reminds me of the visions of sugarplums in the children's heads.


This tree, although it looks fairly traditional, has more character than you see in the traditional trees pictured in magazines. It might be a little too perfect but the homemade touches remind me of children's handmade ornaments and the mismatched charm of a family tree.


The first time I saw an upside tree was in a local bar/restaurant called The Attic. I thought it was such a crazy idea but it fit so well with the look and feel of the whole place - and it was so unique! That being said this look is much too modern for me. I think it would look fun in a game room or perhaps an entertainment area. Still, inner-traditionalist is giving me a firm, "no" to this idea. But that's the beauty about decorating your own tree; it's about what you love! If this upside down pine speaks to you then by all means, seize the day!

I hope these trees were able to provide you with a little tree-trimming inspiration! Christmas is in full swing and the 25th will be here before we know it.

Do you have some inspiration for me? What are your favorite tree traditions and details? Share below or upload your own blog example to Thrifty Decor Chick's Christmas Tree Party!


Just a quick reminder our Lowe's gift card giveaway ends in 4 DAYS! If you haven't entered yet simply click on the picture below, become a follower and leave a comment. Good luck!


~Christi


Leftover Turkey Recipe (Turkey Stock for soup!)

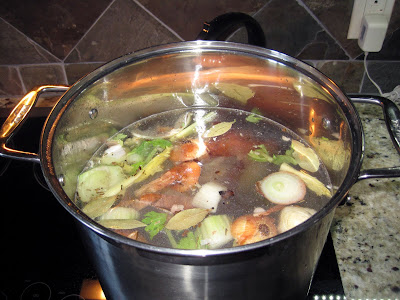
Thanksgiving is over and three days later you are probably down to the last of your leftovers. Your turkey might look something like this:

Don't throw that carcus away, use it to make turkey stock for some tasty homemade Turkey Noodle Soup.

In the past, when I have made soup, I have always opted for the store bought stock. Lately though, whether it is a chicken carcus or turkey carcus, I have been making my own. It's so easy to do and saves money. Plus the flavor is so much better then the store bought stock.

To start off with, remove any little edible pieces of meat from the turkey. You will use this in your soup.

To make the stock, start out with a turkey carcus (or chicken), some veggies, and a few bay leaves. When cutting up veggies for T-day I saved all the onion tops, celery leaves, and leftover carrots. If you don't have leftover veggies, use some that you have in the refridgerator. The veggies add some sweetness to the stock and can offset the salt from the turkey.

In a very large stock pot, place the turkey carcus, veggies, bay leaves and cover with as much water you can put in the pot without overfilling.

Bring the pot to a boil, then reduce to a simmer and let it sit for hours! Yes, I know, hours! It sounds like a long time, but to get maximum flavor out of your stock you need to have the bones cook for a long time. The bones are what give the stock flavor.

We started the stock about 3pm and let it go until 11pm. I say "we" because my brother-in-law Joe was helped me make it. I started it, but really he watched over it and finished it for me. SO nice! While the stock is simmering, take a spoon and remove any foam or fat that rises to the top. Just place it in a bowl so you can throw it all out later. The foam and fat will make the stock cloudy if not removed regularly.

In addition, you will need to add water as you simmer the stock. The water will evaporate and it is very imporant to let that stock simmer for hours to get all that extra little flavor. Just add water as needed.

After a few hours, if you are ready to call it a night, taste the stock. If the stock tastes great, then you are done! If it tastes watery you need to go into rapid boil mode. No more adding water to the stock. Just turn the heat up to high and boil that water down! It will reduce the amount of stock and concetrate the salt.

Next we will need to cool the stock. To do this, place a strainer into the dish you would like to store it in. Pour the stock through the strainer. The strainer will catch all the bones and veggies. Remove the strainer and place the stock into the refiridgerator.

When the stock is completely cooled, you will see it has seperated. The top layer of the stock will be a lighter color then the bottom. That layer is fat that has risen to the top. Take a spoon and scrape most of it. There is nothing worse then a greasy stock :(


Now you are ready to make soup! Here's the recipe I use:

Turkey Noodle Soup
Serves 6 people with 2 cups of soup each.

2 cups of turkey pieces
2 quarts turkey stock
1 cup celery, sliced into 1/4 inch chunks
1 cup carrots, sliced into 1/4 inch chunks
1 bay leaf
2 cups egg noodles, wide variety
1/4 cup fresh parsley, chopped

1. Heat turkey stock. Simmer stock in an uncovered stock pot or similar pan on stovetop before adding other ingredients.
2. When the stock is simmering, add celery, carrots, and bay leaf.
3. Cook until carrots are slightly tender. They usually take the longest.
s, Add noodles and cook until they are fully cooked (8 to 10 minutes)
4. Add turkey meat and then parsley. Allow to cook for an additional 4 minutes or until meat is heated and serve hot.

Serve it up on a cold winter day with some crusty bread to warm the hearts of your family :)


~Beth

Thursday, November 25, 2010

Classic Green Bean Casserole

In case any of you are looking for a quick place to reference the classic recipe, here it is!


Photo Source

1 can (10 3/4 ounces)Cream of Mushroom Soup
1/2 cup milk
1 teaspoon soy sauce
Dash ground black pepper
4 cups cooked cut green beans
1 1/3 cups of French Fried Onions
Stir the soup, milk, soy sauce, black pepper, beans and 2/3 cup onions in a 1 1/2-quart casserole.
Bake at 350°F. for 25 minutes or until the bean mixture is hot and bubbling. Stir the bean mixture. Sprinkle with the remaining onions.
Bake for 5 minutes or until the onions are golden brown.

And enjoy! Happy Thanksgiving to you and yours! Wishing you a wonderful turkey day with your loved ones.

~Christi

Wednesday, November 24, 2010

Pumpkin Pie from Real Pumpkins

Want a treat for your family this Thanksgiving? Make some pumpkin pie from real pumpkins. That normal canned pumpkin can't beat the smooth, sweet flavor of a home cooked pumpkin.

To start out with, you will need a pumpkin. The smaller the pumpkin, the better it is for pie. I made it last year with the left overs of a jackolantern and it turned out great, so if all you have is the big pumpkins use them!


Cut the pumpkins in half


Scoop out the seeds.
As an added bonus you can make roasted pumpkin seeds. To do this, scoop the pumpkin meat and seeds in to a bowl of warm salt water. Discard large chunks of your pumpkin meat into a compost bin or trash can. Sift out the meat from the water and discard. Just try to get most of the meat the best you can, it's hard to get it all.
Strain the seeds and put in a bowl. Pour about 3 tablespoons of olive oil and salt to taste. Spread the seeds on baking sheet and bake at 300 degrees for 45 minutes. Every 15 minutes, stir around so all sides get crispy. Enjoy!
Back to the pumpkins...place the pumpkins in a shallow baking dish. Pour about 1/2 inch of water in the dish and cover with plastic wrap. Cook in a microwave for 15-25 minutes. Keep checking until pumpkin is very soft when poked with a fork.Once the pumpkins have cooled, use a fork to scrape out the meat and puree in a food processor or blender.
Once you have your pumpkin all pureed you are ready to make your pumpkin pie. Sometimes there might be some excess water in the pumpkin and it will form on the top of it. Just pour it off.

For the pie, I have always liked Libby's Pumpkin Pie recipe so this is the one I use:

1 (9 inch) unbaked deep dish pie crust or make your own
3/4 cup white sugar
1 teaspoon ground cinnamon
1/2 teaspoon salt
1/2 teaspoon ground ginger
1/4 teaspoon ground cloves
2 eggs
15 ounce of your pureed Pumpkin
1 (12 fluid ounce) can Evaporated Milk

1. Preheat oven to 425 degrees.
2. Combine sugar, salt, cinnamon, ginger and cloves in small bowl. Beat eggs lightly in large bowl. Stir in pumpkin and sugar-spice mixture. Gradually stir in evaporated milk. Pour into pie shell.
3. Bake for 15 minutes. Reduce temperature to 350 degrees F.; bake for 40 to 50 minutes or until knife inserted near center comes out clean. Sometimes it will take longer because pumpkin not in a can has more moisture. Cool on wire rack for 2 hours. Serve immediately or refrigerate.

Hope you all enjoy your homemade pumpkin pie and I wish you all a yummy Thanksgiving!

PS- My next recipe will be making turkey stock from your leftover turkey carcass to make turkey noodle soup! Save all onion tops, celery leaves, or really any veggies you would normally throw away to add into the stock. It's a great way use up leftovers!

~Beth

Tuesday, November 23, 2010

TMJ: How to Treat it and Manage Your Stress


Temporomandibular joint disorder...


Uhhh... say what?


Photo Source

TMJ is Temporomandibular joint disorder. Try saying that 5 times fast!

It started with a sore throat, grew into a bad ear ache and the next thing I knew I was in so much (CONSTANT) pain I had stopped eating. When all was said and done I lost 5 lbs.

Initially I thought it was just an infection. Doctor #1 agreed and quickly prescribed amoxicillin. So I took the medicine faithfully and just waited, hoping the pain would start to dull. Hoping it would stop hurting when I smiled; when I talked. Unfortunately the amoxicillin messed with my sugar (as the doctor said it might with the whole hypoglycemia problem - no I swear I'm not a hypochondriac!) and I about fainted 3 different times. No bueno :( So here I was needing to eat to combat the nausea/dizziness caused by the amoxicillin and yet I could barely bring myself to drink chicken broth!
...Bring on Doctor #2. This man who I was initially skeptical of looked in my ear and said, "You don't have an ear infection whatsoever. Your ear looks completely normal." WHAT?!! I wanted to burst into tears (for about the 5th time). Here I had been laying on heating pads, taking ibuprofen and amoxicillin, missing way too much work and I was NOWHERE close to being better. I just wanted some relief! Just for 5 minutes. The pain would simply not cease.


He said he believed it to be TMJ and so we went over my symptoms and some of those of TMJ:

Difficulty chewing or biting? Yup
Clicking Jaw? My jaw has done that for as long as I can remember
Neck/Jaw pain? Yes, well now that you mention it...
Earache without infection? Well... evidently yes!
Headache? I'd had a horrible one every morning this week

Combine these symptoms with the thought in the back of my mind: "I know I clench my jaw while I'm sleeping... I always wondered if that was bad." It looks like TMJ was the culprit. Doctor #2 gave me some muscle anti-inflamitories and sent me on my way. Unfortunately this still wasn't enough. I ended up at the Dentist the next day where they fit me for a mouth guard (way too expensive but at least it's not giant, as dorky, or as obtrusive) and gave me muscle relaxants. And there the relief finally started. I honestly hate taking medicine but it wasn't until I was prescribed muscle relaxants that I was truly able to sleep and relax myself.


So what is the lesson in this story, kiddos? Okay, yes don't clench your jaw. I now have to do fun jaw exercises in the morning and stick my tongue between my teeth before bed so as to prevent clenching. But what brought all of this on?

::::::STRESS::::::

Sure I knew I was busy. Working full time and going to school. But I didn't think it was that bad. However as I think about it I realize that I have the tendency to manifest stress in my body. When I took the ACT in high school I all of the sudden developed a back problem. I couldn't look down (touch my chin to my chest) without extreme pain in my neck. Yes a class I had been taking had provided me with some extra worrying and frustration (w/ the teacher) but I didn't think it was that bad.


So what's the lesson we can learn from this? It is important to keep your health in check and manage your stress effectively. I decided there are 3 ways for me to approach this:

1. Get Moving! (exercise)
2. Pray More
3. Take it one day at a time

When I get home from work and then finish an assignment admittedly the last thing I feel like doing is exercising. However when I do exercise I notice I just feel better. Like I was able to run all that stress and frustration and worry right out of my body! So whether it's running, using the elliptical, or doing something you simply enjoy like basketball, tennis, golf etc, get moving! Exercise helps you to cope with the stress and my personal favorite, sleep better.

Pray more. Blessed Teresa of Calcutta said that when we do not have time to pray we should pray more. I believe this is an important component of managing stress because prayer helps us to develop better self-introspection and also reliance upon God. When you take the time to talk to God and open up about your worries and doubts God will listen and bring you peace. If you don't believe me simply stop right now and think about something that is plaguing your thoughts. Offer it up to God. Feel better? Yeah, me too. God will never give us more than we can handle!

Take one thing at a time! As I sit here and write this blog I should really take my own advice. I feel absolutely overwhelmed with everything I have to cram in for this class before the end of the semester. Another module worksheet, an unexpected paper (it's a long, bad story), and the final from HELL! Take a deep breath. One thing at a time! What takes top priority? Tackle this first and then move on to the next thing. Make a list and feel the gratification as you place a big red check mark next to one of the items.

And lastly, some tips on how to treat TMJ:
-De-stress... however possible, find a way to relax! Take a bubble bath, get a massage, or as I said before: pray more!
-Alternate between a heating pad and an ice pack. This really brought relief and the different sensations soothed my jaw.
-To be honest, I didn't get relief until I saw a dentist and they gave me muscle relaxants. No this isn't the best advice but if your pain is bad enough it's causing you to miss a lot of work then go see someone! Tell them how bad it is.

I hope my story and pieces of advice help anyone out the suffering from TMJ or just plain stress! The moral of the story? Take care of yourself!


~Christi


Saturday, November 20, 2010

Crispy Chicken Nuggets


One morning, enjoying a bowl of shredded wheat my husband saw this recipe on the back of the box. Intrigued, he wanted to try it and we fell in LOVE with these chicken nuggets. The shredded wheat adds a little "healthy" fiber to the mix and the honey mustard sauce is awesome. I have recently updated this recipe to be even healthier and include calories on the meals. Kids of all ages (and husbands) will enjoy this healthy/tasty dish!


2 cups bite size shredded wheat cereal, crushed
1/2 cup egg beaters
1 lb chicken breast, cut approx 1-inch by 1-inch (boneless, skinless)

Dipping Sauce
1 tablespoon honey
2 teaspoons mustard
1/2 cup low-fat mayonnaise

1. Preheat oven to 400°F.
2. In a bowl crush cereal down to 1 cup. I usually put it in a bag and roll a rolling pin over it.
3. Dip chicken into egg beaters and then roll in dry mixture in shredded wheat to coat evenly.
4. Place on rack in shallow backing pan.
5. Bake 15-20 min or until chicken is cooked.
6. For the dipping sauce: whip mayo, honey, and mustard together until smooth.

The skinny: 28 Nuggets @ 31 calories each

The dipping sauce is a little higher, but we never eat the whole thing:
source


~Beth


Thursday, November 18, 2010

How to Spray Paint A Filing Cabinet


When trying to figure out how to spruce up my office I wasn't sure where to start. Suddenly I was thrust back into a familiar almost college dorm-like situation where I cannot paint the walls or customize anything. So what does someone do in my circumstance? Get creative and work with what you have!

First Example: Giving my old but functioning filing cabinet a much needed face lift. I knew that with some hard work and a coat of primer and spray paint I could give this cabinet new life.

Step 1: Head over to work on your filing cabinet and find your loving husband actually taking care of Step 1 for you:
Aww! Come on you gotta admit that I have a great guy. While Nathan did most of the sanding I made sure he taught me the basics. He prefers a "random orbit" sander for the best finish. After going over the cabinet a couple times we took a few sheets of sandpaper and made sure we went over the glossy areas that were left.

Step 2: Wipe down the filing cabinet to remove all the dust. Make sure to be thorough!

Step 3: Tape up the edges before you prime. We even made sure to cover the key hole with painter's tape.


Step 4: Prime the cabinet


Step 5: (once the primer has dried) try spray painting and realize that some dust must have blown into the primer since you were working on this project outside. Grr... when I started spray painting I noticed flakes popping up everywhere. My mom, a spray paint guru, came to the conclusion that it was a little windy when we were priming and thinks some dust became stuck in the primer. To rememdy the situation we purchased a sanding block and went over the cabinet until it was smooth(er).


Step 6: Spray Paint! Can you believe I've never spray painted anything in my life? There's a first time for everything! The trick is to keep the can about 5 inches away and spray in continuous, fast moving strokes. It took me 3 coats to finish this baby.

Step 7: Let it dry and then stand back and marvel. What an IMPROVEMENT! And just what my office needed. Not only was it fairly easy (I'm sure it will get better with experience and practice) but it was pretty cheap! Just a few cans of primer, spray paint and a sanding block.


Up next, how to fill blank space on the office walls... stay tuned!


~Christi

Like This?- Pin It!

 
Copyright 2009 between3sisters