Thursday, May 31, 2012

Easy Crockpot Cheesy Potato Hamburger Casserole

I am not a casserole girl..... I use to be, but I think during college I ate so many of them that I just don't enjoy them as much. Once in a while though, I will stumble across a super easy casserole recipe that I find it hard to resist trying and this is the case of this recipe. My husband really liked it, but requested less cheese the next time, so I pared down the cheese in this recipe. It's easy to put together and goes right in the crockpot, so make early in the day and dinner is ready at night!  

Crockpot Cheesy Potato Hamburger Casserole

1 pound ground beef
1 medium onion, chopped
1 box of Betty Crocker Cheddar & Bacon Scalloped Potatoes
1 can whole no salt kernel corn, undrained
1 can 98% fat free cream of celery soup
pepper to taste
4 slices of 2% American Cheese or 2 cups of shredded cheddar cheese


1. Brown the ground beef in a skillet over medium heat.
2. When beef is cooked, add in chopped onion and cook until translucent.
3. Drain the beef/onion mixture.
4. In crockpot, place scalloped potatoes in bottom and mix with powered cheese mixture.
5. Pour can of undrained corn onto potatoes.
6. Top with spoonfuls of cream of celery soup.
7. Place ground beef/onion mixture on top of the soup.
8. Sprinkle with pepper. You can salt this too, but I found with the soup, potatoes, and cheese that no salt was needed.
9. Top with cheese slices or shredded cheddar cheese.
10. Cook on low for 4-6 hours, depending on your crockpot. After a few hours, I stirred mine so the cheese would not burn on the sides.


Enjoy!


Like this post?


Monday, May 28, 2012

The Fire Truck Room #3: The Reveal

Well the big day has come, the revealing of the fire truck room. It's been a long project over the last year and it is nice to say it is FINISHED!! I have been posting random blogs about this room, please read:

The Fire Truck Room #1
DIY Painting A Dresser
The Toy Box
The Bookshelf
Hanging Bookshelf From Crib Bumper
The Fire Truck Room #2: The Before)

To review, the fire truck theme came about from the fact that my son's Farfar use to be a fire fighter. Both he and my husband have fond memories of those fire fighter days-- the large fire trucks and putting out the fires. Also, I like that I can use the red and white color scheme for any future rooms that Aiden might ask for, such as a Nebraska Husker room (my husband's alma mater University of Nebraska). The third reason, I just think the theme is super cute! I mean, what is not to love about fire trucks and there is a lot to choose from when it comes to decoration!

The moment has arrived, the big reveal. I hope I didn't build this room up too much! This is the right side of the room when you walked in before.

And now this is the right side of the room. The table was $14 at IKEA and the chair were given to me by my sister Luci. They use to be beat up spider-man chairs, but I painted them white so hopefully they can go with other kids things in the future. The main black area above the table is a chalk board so Aiden can draw  to his heart's content.

I used his bookshelf and attached the changing pad to the back of it so it would double as a changing table. I know, people still think it's crazy that I use a changing table, but it works and saves me from having to bend over him with this huge prego belly of mine. I attached a red basket from IKEA to the side of the bookshelf to hold diapers and wipes. 

The large AIDEN letters are cardboard from Hobby Lobby that I just painted red to match the room. I had him random letters while changing him and he likes to say the letters over and over again. However, he love to stick his foot through the letter "D", which makes changing him a little tough.

This is the window/left side of the room before. 

And this is the window side of the area now. You will see that I hung a couple more shelves, the hanging bumper pad book holders, and the toy box also doubles as a window seat.

I love plants and I have so many. Aiden has grown very attached to this one, he like to touch it every morning, so it has made it's way to being a permanent fixture in the room.


Here is the new painted toddler bed and the fire truck painting I made him.

 I am absolutely in love with this brown wall! It just adds some good contrast to the colors of the room. 

This is the closet and the entrance to the room before I changed them a little. 

I added a fire truck over the door rack to the entrance door and hung a custom growth chart for Aiden on the closet door. 

Here's a better view of the growth chart. I am so glad to have a printer connection that will allow me to make custom artwork like this growth chart. (If you want something like this just email me and I can give you more info.)


That's the big reveal of the fire truck room. I hope I will have given some of you out there some cute ideas to add to your own toddler's room. Now only if we can get him to stay in that toddler bed.....that's a different story and there will be more on that soon!


Like this post?


Sunday, May 27, 2012

Naked Potato Salad

This is not your normal potato salad recipe! This is a mayo or miracle whip free potato salad, which my husband will LOVE! I adopted this recipe from Giada at Home's recipe Red Potato and Tomato Salad but thought hers was super bland so changed some of the ingredients! Enjoy!

1 pound baby red potatoes, halved
1 pint grape tomatoes, halved
5 scallions, sliced
1 6 oz. can of pitted black olives, halved
1/3 cup chopped fresh italian parsley
1/4 cup of capers
3 tablespoon chopped fresh thyme leaves
1/3 cup extra-virgin olive oil
1 large lemon, zested
1 half of lemon juice
Salt and pepper

1. Boil potatoes until fork tender.
2. Drain potatoes and let them cool to room temperature.
3. In one bowl, mix together all ingredients: potatoes, tomatoes, scallions, olives, parsley, capers, thyme, olive oil, lemon zest, and juice from half of the lemon that was zested.
4. Toss gently until all the ingredients are coated.
5. Taste and season with salt and pepper. Depending on the saltiness of your olives and capers you might need to add more salt.
6. Refrigerate for a few hours before sevice and toss again before serving.


Like this post?

Friday, May 25, 2012

Zuppa Toscana Soup

My cousin Nikki was raving about this soup recipe a few weeks ago and sent it to me. We have had a couple of cold rainy days lately so I made this for dinner the other night. It was a HUGE success! I loved the green the kale added to the recipe and overall it was great comfort food! Serve with some crusty bread on the side!

1 lb ground Italian sausage (I use 1 package of Johnsonville Spicy Italian Sausage, removed from casings)
1 teaspoon of crushed red pepper flakes
1 large diced onion
1/4 cup turkey bacon pieces, crumbled small
2 teaspoons of garlic, minced
1 pound potatoes, or about 2 large potatoes, sliced in half, and then in 1/4 inch slices
6 cups water
2 (14.58 ounce) cans chicken broth
1 cup heavy cream
2 cups of kale


1. Saute Italian sausage and crushed red pepper in a large pot. Remove from pan and drain excess fat. Keep warm.
2. In the same pan, saute bacon, onions and garlic for approxiamtly 15 mins. or until the onions are
soft.
3. Add in diced potatoes.
4. Add chicken broth and water to pot and stir.
5. Add sausage and bacon and salt and pepper to taste.
6. Simmer for another 10 minutes, to thicken the soup.
7. Turn to low and add heavy cream and cook until thoroughly heated.
8. Add kale just before serving. Delicious!

Makes: 6-8 servings

Thanks Nikki!


Like this post?


Wednesday, May 23, 2012

The Fire Truck Room #2: The Before

It's finally here....almost! The big reveal of the fire truck room for Aiden. I am probably building this up way more then what I should be, but it's always a nice feeling when you have a long project finished.

Periodically, I have been posting things about this room (see The Fire Truck Room #1, DIY Painting A Dresser, The Toy Box, The Bookshelf, and Hanging Bookshelf From Crib Bumper) and after almost a year of redoing random garage sale finds and painting the room the last few months, I am finally finished!

I thought I should  start out the big reveal with a little peak at what the room was like before. Now keep in mind, we moved into this house less than a year ago and no decorating was done. The room is very small, but fine for a kid his age.

This is the right side of the room when you walk in.

You will see bookshelf and the dresser are already in use.

The left side of the room had the crib and rocking chair, which will go into the new nursery.

Also, you have the door to enter and the closet door. I have a little bit of a plan to dress them up!

Anyways, that is his super tiny room! I can't wait to write the post up on the reveal of the room!


Like this post?


Saturday, May 19, 2012

The Open Toy Box

It seems that I am always in need of more toy storage in our house. It's not like my child has a lot of toys, he doesn't, but some of the ones he has are too big to fit into his little toy box we are currently using. For the last year, we have been using the toy box I refinished for his fire truck room (Garage Sale Redo: The Toy Box). I knew that once his fire truck room came to an end we would have to move this toy box out of the living room and into his room.

My original idea was to build him a large desk, with two storage cubes under the desk that could roll out. I worked for hours on this plan with Google Sketch.

I excitedly cut the wood for this project (just the desk part, not the cubes) but made a promise to myself I couldn't work on it until I finished the fire truck room. Months later, the desk pieces were cut but the desk was un-built and I started to lose heart in the project. Two 2'x2' cubes for storage didn't seem like enough storage room for me. In addition, at IKEA one day I found a table for $14 that was the perfect height for little chairs my sister Luci had given me, so the whole desk idea went out the window.

Browsing online I found this great open toy box idea from The Land of Nod
source

I love the large open storage concept and thought it was great for the larger toys! After look around on the internet I ran across plans for this on Ana-White.com. I love her website and thought this would be PERFECT!! I loved the open storage on the bottom and the shelves on the top.
source
source

My goal was set-- build the bottom storage unit and wait on the top bookshelves for a later date. Now I decided to not be wasteful and use my cuts I had already made for the original desk I was going to build him, which ended up being one 4'x8' sheet of MDF.  The storage cube I built is 4-feet long, 2 -feet tall, and 2-feet deep. The top is 15-inches, perfectly cut to be the right size for me to put some of my extra baskets on it. The front board on my box is 9" tall, making it only 9" deep. I fretted about whether this would be deep enough, but it turns out it is!

I unfortunately didn't take any picture while building this project, I was just too excited to get it finished! I sort of winged this job too. Ana-White's website wouldn't load the plans, so I just made the desk up like how I thought it should be.  Really any dimensions you want with the shelf would work. My dimensions below are estimates as you have to account for the thickness of your MDF.

In a nutshell, with no pictures, here's the basics of how I made this shelf.
1.  I attached the bottom and back 4'x2' cut MDF to each other to make an L-shape. I used a counter sinking bit and used 2" all purpose screws.
2. Attached the side walls and center wall boards to the back and the bottom board, again using a counter sinking bit and used 2" all purpose screws.
3. I didn't want screw holes to show on the front and the top, so I glued these boards on and used my nail gun to nail them to the existing boards.
4. I filled all the nail holes with wood fill and plugs for the countersinked holes.
4. Lastly, I knew this thing would be heavy! Super heavy, I flipped it over (with the help of my strong husband) and attached wheels to the bottom.
5. I thought the wheels would look tacky sticking out, so I nailed trim around the box with the nail gun and reinforced the trim with some 1"x2" scrap boards I had.
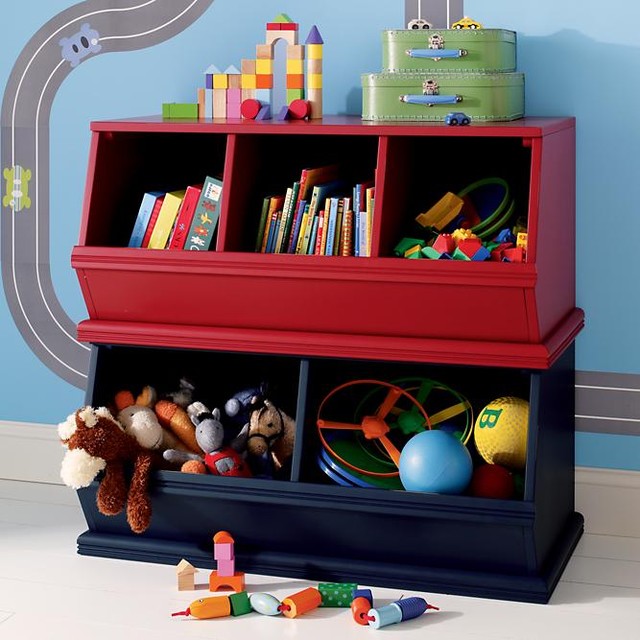
6. I painted it and here is the finished product!


Now, if you can't tell we have plenty of toy storage room! I chose the red color to match the lining of my baskets and painting on the wall. The baskets hold books and duplo blocks.

Of course when Aiden saw those toys in the box, he was determined to take them out! 

Well, that's the end of another project finished! Just a few more to go off my list of things to do (Countdown of Summer Projects):
1. Fire truck room
2. Under deck sandbox/playground
3. Organizing the shop
4. Little girl's nursery

Better get to work!


Like this post?


Thursday, May 17, 2012

Countdown of Summer Projects

It hit me the other day, I have less that 18 weeks till our second baby comes. That means I have 18 weeks to finish numerous summer projects.


Now many of you reading this blog might notice the lack of blogging from me. I have been traveling a lot lately, sleeping a lot lately, but also I have been working on projects a lot lately. I just haven't had time to write blogs about all of them.

I decided to write this blog as sort of a teaser to projects you can expect to read a blog on in the future. I have 18 weeks to get so many of these projects done, but luckily there are so many that almost finished. (Also, on a side note, I am writing this blog to remind me of all the things I need to get done and soon!)

1. Fire Truck Room

I know I have been going on for months now about this room. Working on little projects, here and there. Honestly, I am almost done! I have 2 things left to do. Hang up his custom designed (by me) growth chart banner and paint two little chairs white that my sister gave me. That's it! So hopefully this blog will make it's debut soon!

2. The Under Deck Sandbox
Yet another project I am almost finished with. The box has been built under our tall deck, stained, and filled. I still have a few playground toys to attach to the structure, install a swing, remove some poorly place Hostas and add some more rock. Actually I hope to do this right after I finish this blog! 

3. The Open Toy Box

As always with kids, you need more toy storage. I saw this online and decided I could build it and actually I did build yesterday. Really I just built the blue storage on the bottom half of the picture and plan to add some cube storage to the top some day. All I have let to do is paint it! (If you can't tell I like to start projects, just not finish them.)

4. Organize and Clean The Shop
Imagine the messiest place on earth-- full of tools, sawdust, screwdrivers, nails, and trash. That is our basement shop room. Making the above toy box was quite the task as I had to dig around for all the tools I needed. I don't have a picture of the messy place, but I am hoping to make a nice little blog about the clean-up project. It needs to desperately be cleaned and organized!

5. My Little Girl's Nursery
Yep, we are having a girl so you can bet that I am going to make her room so darn cute! I have grand plans for trees on the walls, pink paint, great colorful curtains, pink pillows, removing the closet doors, and did I mention pink? Pink and green will be the dominant colors of the room. I have already ordered the fabric and plan to reuse my green crib set from Aiden. With with a little luck, I will be able to get this finished some day! So a sneak peak of the room, here is the fabric I LOVE!

Anyways, that is my list so far for the summer. Not to mention a couple more vacations, two family reunions, and trying to get my kiddo Aiden to sleep in a toddler bed. It should be exciting! 


Like this post?


Sunday, May 13, 2012

Baby 2.0: We Are Having A .......

Well, many of you who read this blog saw a few months back I posted that we were expecting our second child. (Baby 2.0)  I am officially 20 weeks along and still can't believe how tired I am! If you haven't noticed the lack of blogging from me, I have just been too wiped out! Not to mention the fact we have been on 2 vacations in the last 3 weeks, which alone is enough to wear a girl out. Also, throw being pregnant and chasing a 19 month old around and you have a big recipe for sleep!

Anyways, if you don't know this already, 20 weeks is the magic number of weeks when the doctors will finally tell you the sex of your baby. Many people like to wait till the birth, but I honestly can't stand it!!! I want to start brewing ideas for the nursery right away!

The magical day came on Friday and they do their best to keep you waiting to find out. First they checked all the usual-- you know the head size, leg size, arm size, counted fingers...you can see it the pic below the baby appears to be sucking their thumb.

Then they showed us a side view of their face.

And then the awesome 3-D view that was super hard to get. The technician tried forever to get a better picture but the baby was really camera shy! The nose is missing in the pic below as the baby was doing their best to hide it's face.

And finally after waiting 20 weeks to find out, she typed the gender on the screen!

It's A GIRL!!!!

I can honestly say we are super shocked to find this out. We wanted a girl sooo bad and as my husband said the odds are 66% that we would have the same sex as the first child. I did a bunch of voodoo magic tricks to try to get a girl and I guess one of them must have worked!

So that is our happy news as of late! I am sure you will see this blog decorated everywhere with pink very soon! I have already gone garage sale shopping and purchased over 17 pink sleepers and 5 dresses. I am looking forward to decorating the nursery and seeing this little girl's face soon!!!


Like this post?

Friday, May 4, 2012

Survey Time!


I saw this survey from the fabulous Greta over at Modern Garden Blogspot and felt compelled to fill it out (even without a tag!).  So here are some deep and not so deep answer to some basic questions :)

...

1. What do you like to do for fun?

I feel like this is a bad question to answer namely because I feel that I don't have time for fun right now (how lame does that sound?).  But I suppose the best answer is relaxing with my husband, perusing fashion and home magazines, Pinterest and yes, Youtube videos.  I think I kind of followed in Beth's technology nerd ways and really enjoy all of the amazing things I can find on the world wide web.  Yes, that also sounds super lame but I am constantly amazed at how much I continue to learn about the world and my faith via the internet.  Whether it's reading someone's blog, following someone on Twitter, or asking question in an online group, I am constantly learning and thinking!  

2. If you could live anywhere in the world, where would you want to live?

This question brings up something I was just thinking about last night... but first I will say the "fun" answer.  OUTSIDE of where I currently live, I would say London or Italy... easily my favorite places from my collegiate study abroad trips. 
Okay, but here's the real deal. I was thinking last night about how it is "not cool" to live in the place you are from. People often look down on others who live in their hometown. I'm even reminded of George Bailey in my favorite movie "It's a Wonderful Life"


Yes, George Bailey wanted to leave his town, get over everything and forget about it.  But nobody talks about if your town is actually a wonderful place to live and raise a family.  So many people don't know what it's like to grow up living so far away from all of your cousins and Grandparents.  Beth and I have said before that we want our children to be around their family. Because family is the most important thing in life. Family is everything. As a 13 year old I was devastated when I heard we were moving (yet again).  But little did I know this place would become so important in my heart. I met my husband, developed my faith, and my parents were able to finally, "put down roots" as they say. When I look at my husband's family and see their relationships and how they value family above everything else my heart just warms to the thought of raising our kids here and being there for each other.  Raising our kids so they will have the opportunity to see their Grandparents and cousins and other relatives often.  Then I think about the beautiful faith community in town, the affordable and unparalleled Catholic school system, the low taxes... I couldn't have asked for a better place to live and raise a family.  

So to end a long and overly-descriptive answer: I want to be right where I am.

And George Bailey figured it out too.


Photo Source


3. What made you decide to start a blog?

It was actually Thrifty Decor Chick.  Beth and I adored her ideas and work and the more I read the more I thought, "Well, how fun would it be to have a sister blog?"  I have had to take a bit of a sabbatical with full time work and grad school but with the fun changes happening in Nathan & I's life an the end of school approaching, I'm anxious to have more opportunities to blog and write about projects.  *Thanks Beth, for your patience* :)

4. If you could give new bloggers advice, what would it be?

This is a funny one being that I am so political, but DON'T be political.  I am so passionate about politics to the point of crazy but this isn't the time or place for it.  I think of it like a nice dinner party; it's just not a discussion you want to bring up or risk alienating guests over. I cherish the political-free areas in life and this is one of them.  

5. Who is the most influential person in your life?

Easy: my Mom & Dad. As I grow older and observe my mom I see a woman who has a strong passion for Christ, unmeasured generosity, and an immense love and care for children.  When I look at my Dad I see strength, unending patience, loyalty and wisdom.  I am continually amazed and am so incredibly thankful for them.  I know not everyone is so lucky and I know I would not be as good of a person had I not had their influence.

The Residence of Jeff & Lea Merideth
Mom & Dad :)

6. What is one talent that you have always wanted to learn, but haven't yet?

Guitar!  I would really love to learn how to play the guitar.  

7. What is the best life lesson you have ever learned?

Trust God and live for HIM and not for this world.

“I would rather be what God chose to make me than the most glorious creature that I could think of; for to have been thought about, born in God’s thought, and then made by God, is the dearest, grandest, and most precious thing in all thinking.”

8. What would your dream life look like after retirement?

Hmm I honestly have no clue with this one.  We would be comfortable and surrounded by our kids and grandkids, I guess!

9. What message{s} do you hope others "hear" when they read your blog?

That women are amazing and we share many of the same struggles.  But through sharing ideas and encouraging each other we can all accomplish so many things in our lives.  


10. What are your favorite blog topics to read about? {ex: crafting, style, life, humorous, etc...}

Life and makeup/beauty/fashion (duh) :)

11. What is one thing that you could never live without?

Hmm this is a toughie.  I guess I'll have to go with what Greta said and say COFFEE :D


~Christi

Like This?- Pin It!

 
Copyright 2009 between3sisters