Showing posts with label organizing. Show all posts

Sunday, January 5, 2014

Organizing Jigsaw Puzzles

Part of my New Year's Resolutions was to organize my house better. As a parent to both a three and a one year old, the constant battle we are having are toys. However, the worst of all the "toys" are the millions of jigsaw puzzle pieces that we own.

This kid of mine LOVES puzzles:

With puzzles comes all of these annoying boxes that become very hard to store, lose shape which causes pieces to fall out of the side, and then we have lost pieces. 

One day as I was on facebook, I saw an ad on the side for a photo box organizer. (Like the one time I actually look at that sidebar!) It was something similar to this:

I had an idea that this might be just what I need to organize these puzzles. This box opens up and contains little boxes (originally designed to hold 4"x6" photos) but all I could think of is PUZZLE PIECES!

Let the puzzle organization begin! I first decided to make sure all of our puzzles had all their pieces. We put them together and I marked the back of each puzzle with a different symbol. If they ever get mixed up, it will make it easier to tell them apart. 

Next, I took all of the puzzle boxes and scanned the image. (You could just cut the box instead, but I wanted it to be more uniform.)

I printed the images out and trimmed them up.

Then I affixed them to the inside of each box and filled them with the jigsaw puzzle pieces.

The results are wonderful. All the puzzles fit great and it's a nicely organized way to keep the puzzles together.

Looks a bit more organized to me, how about you?

One problem area of my life solved! If you have a great toy organization tip for kids toys I would love to hear it, just comment below!


Like this post?

Monday, February 4, 2013

Organizing Under The Sink

A few weeks ago I came across this post on Pinterest on how to organize your house one day at a time from www.mysimplerlife.com. The idea was simple-- each day of the year have one very small task to complete for a decluttered home. I decided to give it a try. I don't necessarily follow her calendar in order (especially since it's from 2012), but one task a day is my goal. 

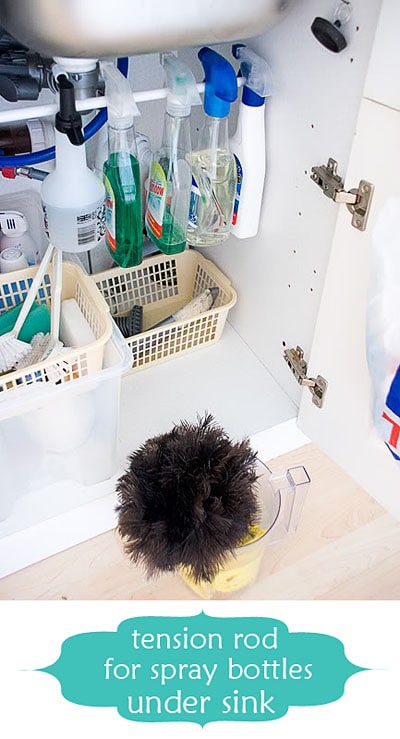
One day I was doing the dishes and noticed how under the sink in my kitchen was a mess! 

I hate having to dig in this cupboard to find my cleaning products, scrub brushes, or large bottles to refill my smaller bottles. This NEEDED to be organized!

I came across this picture from tidymom.net and thought it was such a great idea to keep bottle organized and arranged nicely under the sink. 

However, I have a pull out organizer that holds all of my dish towels and there is no way I could install the tension rod under my sink. I needed another idea. I was going through my bin of organizing extras and came across this $2 towel rod.

I installed the rod on the side of the cupboard and hung up a couple hooks for my brushes.  

After hanging all the bottles, I organized everything remaining from least used to most used. The least used items were placed towards the back (large soap containers to refill small container, compost filters, odd cleaning items, etc.) After rummaging through the rest of my organizing items, I was able to use a basket and a glass jar container for my dish soap.

It may not be the prettiest cupboard under the sink, but it was fast, easy, free and now ORGANIZED! 

Have a small tip that you have found that keeps your life a little more organized? I would love to hear with a comment below! 


Like this post?

Saturday, December 22, 2012

DIY: $4.99 Hair Accessory Organizer

When you 3 month old daughter has this much hair, hair accessories are unavoidable. You can try your hardest to resist, but once you clip that first barrette in her hair you are hooked for life!

In addition to me buying every cute little headband or barrette I see, many people have made me hair accessories for her and that is where the problem lies. I am overflowing with hair accessories and needed a way to organize them. I was talking it over with my sister Luci one day and she said something about seeing an accordion hat rack that would work to organize them and from there the ideas began to flow...

First I went on Amazon in search for an accordion hat rack. I found this one below for $4.99!

 I took it apart.

Painted it pink with the leftover paint I had from decorating her room. (Notice I attached all the knobs on cardboard for easier painting.)

Next, I used some leftover ribbon I had from her room and looped it through the holes of the pieces.

I ended up with all the pieces looking like this: 

I secured the ribbon with a drop of hot glue to the backside of all the pieces.

Then I made sure to press the ribbon down until it stuck and wiped off any excess.

I ended up with all the pieces having ribbons glued to them and just needed to reassemble the hat rack.

I decided to change out the center knobs for some more decorative ones I found at Target.

I hung it up in her room,

and then filled it with all the hair accessories.

Let's just say this is one of the quickest and ONLY projects I have done since she was born. (Just a little busy with a toddler and a 3 month old if you can't tell by the lack of blogs!) It functions great to organize all of her hair accessories and adds some cute decoration to her room. This one is almost full, so I might have to make another one!

Hope you all have a Merry Christmas and a Happy New Year!


Like this post?

Friday, November 30, 2012

DIY: Hidden Storage Wall Cubby

A few months ago, I wrote a blog about my Paint Only Remodels of our Main Bathroom. Now I have talked about this about a million times before, but if you missed it-- I am only allowed to remodel this house using paint. We plan on building a new house on this land in a few years, so my husband doesn't want me to waste money on something we will eventually bulldoze. (You can read more about it on the blog above.)

Part of the issue with our bathroom is storage. We have three drawers and two cupboards...which are all a perfect height for a toddler to get into and unpack every day while getting ready. It's very annoying. We have tried drawer hooks, but he still gets into them. I set out to create another storage unit on the wall, but we really didn't  have room for another medicine cabinet, so I came up with this idea for Storage Wall Cubbies. A few months ago I created these fake paintings and wrote a little DIY Faking a Painting.

I thought they would be great to use as a cover to a wall cubby! A great way to hide the clutter and add some art to the wall. Here is my little DIY on how I created these Hidden Storage Wall Cubbies

To start you need to create two 10"x10" Storage Wall Cubbies:
1'x4'x7' Pine Boards
2' square of 1/4" plywood
Nailgun (or hammer and small nails)
Miter Saw
Table Saw
Wood Glue
4 small hinges
2 cabinet magnet catches

First cut your 1'x4'x6' pine board into 8 pieces that are 10" long with a 45 degree angle on each piece:

Each cubby will need 4 boards that look like below. I like to line them up to make sure they are all the exact same size.

With the boards above, you will assemble your wall cubby. I started with gluing the boards together to make a square.

You will end up with a square like below. (Use can use a L-square ruler to make sure it is square.)

Using an nail gun (or just a hammer and nails) reinforce the box in each corner.

Measure the outside of your cubby box and cut the 2' square of 1/4" plywood into two pieces to be the back of your cubby box. My cubbies are 10"x10" so I cut the plywood to be a 10"x10" square.

Attach the back using a nail gun (or hammer and nails) to create more support to the box. 

You now have a finished wall cubby (or two in my case!)

Now we need to sand and paint it to look professional :) Most likely, you will have some sort of a little gap where the boards meet. Use some wood fill to fill this gap.

Let it dry overnight.

Then sand it with 60 grit, 100 grit, and then 200 grit.

Paint the box your desired color. My frames on my fake paintings are brown, so I matched the color for the cubbies. 

After two coats and a day of drying you should have two wall cubbies that look like this:

Next, install the hinges. Measure two inches from the top and bottom on the frame of your fake paintings.


Install the hinges and you will have a frame that looks like this:

Next, on the cubbies mark where the hinges of the fake painting will meet cubbie. Make sure you give them enough room to close and line up on the cubby straight.

Drill holes in the cubby for the hinges and then screw the hinges in place. 

Now to attach the magnetic catches. These will make sure the frame on the front will stay closed.

Measure two inches to the inside of the cubbies.

Install the magnetic catches. 

On the frame of the fake paintings, install the metal plate for the magnetic catches.


You should end up with some finished Hidden Storage Wall Cubbies that look like this.


Install them on the wall, preferable in a stud so they can handle weight of whatever you put in them. Once installed you have a couple of Hidden Storage Wall Cubbies that hide all your junk you don't want people to see and 

add a little wall decoration to the bathroom at the same time!



Like this post?

Like This?- Pin It!

 
Copyright 2009 between3sisters