Showing posts with label painting. Show all posts

Saturday, December 22, 2012

DIY: $4.99 Hair Accessory Organizer

When you 3 month old daughter has this much hair, hair accessories are unavoidable. You can try your hardest to resist, but once you clip that first barrette in her hair you are hooked for life!

In addition to me buying every cute little headband or barrette I see, many people have made me hair accessories for her and that is where the problem lies. I am overflowing with hair accessories and needed a way to organize them. I was talking it over with my sister Luci one day and she said something about seeing an accordion hat rack that would work to organize them and from there the ideas began to flow...

First I went on Amazon in search for an accordion hat rack. I found this one below for $4.99!

 I took it apart.

Painted it pink with the leftover paint I had from decorating her room. (Notice I attached all the knobs on cardboard for easier painting.)

Next, I used some leftover ribbon I had from her room and looped it through the holes of the pieces.

I ended up with all the pieces looking like this: 

I secured the ribbon with a drop of hot glue to the backside of all the pieces.

Then I made sure to press the ribbon down until it stuck and wiped off any excess.

I ended up with all the pieces having ribbons glued to them and just needed to reassemble the hat rack.

I decided to change out the center knobs for some more decorative ones I found at Target.

I hung it up in her room,

and then filled it with all the hair accessories.

Let's just say this is one of the quickest and ONLY projects I have done since she was born. (Just a little busy with a toddler and a 3 month old if you can't tell by the lack of blogs!) It functions great to organize all of her hair accessories and adds some cute decoration to her room. This one is almost full, so I might have to make another one!

Hope you all have a Merry Christmas and a Happy New Year!


Like this post?

Friday, September 14, 2012

DIY: Faking A Painting

Have you ever taken a picture or seen a print that you wished you could turn into a painting? This happens to me all the time, as I tend to not like all the standard paintings you find at most stores and I refuse to pay a lot of money for artwork.  A few years ago, I came up with a method of how to fake a painting. What I mean by "faking a painting" is taking an actual image, print it on a flat piece of media, and applying a coat over the top of it so it looks like a painting. To the untrained eye, it looks like a painting. 

For example, I did this technique for all of my paintings in my old living room:

Even though they might look like prints in this picture, up close they look like a painting. I have had several people ask me if I painted them. 

With that said, I was needing a few paintings in my bathroom I am remodeling and I couldn't find anything I liked in the size I needed. (A few months back, I posted how I hated our main bathroom and was in the process of trying to make it not so 1970s.) I thought I would write a little DIY on how you too can fake a painting. 

To start, you need to determine what image you are wanting to turn into a painting and apply it to a canvas. You can go several routes with this. There are many printers out there who will print directly to canvas material or you could have your image printed on decal and you could apply it yourself. The paintings in my living room were printed directly to the canvas. (Or course I work for a printing company, so it cost me nothing. You can email me and I will give you their information for printing.) 

 In the case of the paintings for my bathroom, I started with two 10-inch blank canvases and a wall decal that I found at Hobby Lobby. 


I trimmed out the images I wanted from the wall decals and applied them to the canvases. 

They weren't quite large enough for the canvas, but I will make it work. 

I took brown acrylic paint and painted a brown border around the outside of the decals to fill up the canvas. 

I ended up with two canvases that looked like this:

Next, you will need some Gloss Glaze. You can find this in the painting section of any craft store. It's clear and will give the effect of brush strokes on the painting. 

Apply the Gloss Glaze using a few different types of brushes. Paint the glaze on as if you actually painted the image. Which means, run strokes where there are different colors and use different motions, dabbing, and other painting strokes. 

Allow the glaze to dry and you should be left with two canvas prints that do a great job in being "faked" to look like a painting. (Sorry it is such a bad picture, the lighting was super bad in the room at the time. When you see what I will be using the canvases for, it's a better image on how they look like a painting.)

Usually, I wouldn't do the border, but these prints/fake paintings will be hinged to my latest storage project. Stay tuned to find out! 


Like this post?

Tuesday, September 4, 2012

Garage Sale Redo: The Ikea Trofast Shelf Part 2

The time has finally arrived, the reveal of the Garage Sale Idea Trofast Shelf.

If you recall in my last few blogs, I have been looking for a way to add more toy storage to our house. I originally built this open bookshelf, but it has proven to not be enough storage needed for all the toys we have accumulated over the last almost 2 years. 

With the second child coming, I knew we would need something else. That was when I saw this beauty of a organizer at a garage sale for $5.  (Garage Sale Redo: The Ikea Trofast Shelf)

However, I did not like how it fit with the bottom piece--it was just not wide enough and looked very funny. I decided to add some side shelves to the Ikea Trofast Shelf (here is the tutorial DIY: Building Furniture Side Bookshelves) and ended up with something like this:

After the shelves were added, I sanded and primed the Trofast Bin Shelf.

Then I painted it to match the lower unit. (Please ignore my super messy shop, just one the thing many things on my to-do list to organize!)

 I attached it to the open toy box and filled it with the bins.

It was complete!! We have lots of extra toy storage and a place for books to go!

Also, as an added bonus I found out that I had some baskets that fit the top of it perfectly, so even more toy storage!! (Just so you know, half of the bins are empty and the baskets are empty, just room for more toys someday!) 

Anyways, it's amazing what you can find at garage sales and what you can build with just a little extra work. I hope I have inspired some of you out there to go treasure hunting at garage sales soon! Until then, happy building and painting!!


Like this post?

Tuesday, August 7, 2012

Baby 2.0: The Nursery Reveal

The big nursery reveal day is finally here!! It's officially 6 weeks until we can expect to see the face of our little girl! In May, we found out our second child was going to be a girl and I started scheming ideas for the girl nursery (see post here). I believe, after months of work, I am finished with the nursery-- minus any little items I might find after this post to help decorate the room. Also, as for baby 2.0 projects, this should be one of the last posts on the subject until she arrives...should be, but might not be. (To see more posts about Baby 2.0 you can click here.)

This room is located in the front of our house and our largest bedroom. Like the rest of our house, it was a very dated 1978 room. Complete with the swag window treatments, plastic blinds, and dated ceiling fan. We have used this room as our guest room and basically our overall storage room. 

I really wanted to keep a queen bed in the room for me to crash in on those nights when she is having trouble sleeping. I had a bed in the room with Aiden and LOVED it! Also, my husband appreciates the quiet when he is trying to sleep and the less disruption of me getting in and out of bed. 

I went for a pink and green color scheme to the room and wanted to add in some trees to the design. This is what it looked like when you walk into the room before: 

This is now what the room looks like:

I painted wide stripes on one wall to create a little depth to the space and I painted the trees on the wall for some nice contrast to the pink. The trees look black, but they are really brown. The day I took the pictures it was just really hard to get the lighting right, so sorry the trees look black.

A view of the other side of the room.

And the after.


A closer look at the crib, rocker and other side of the room. You can see half a clock, which was a clearance hobby lobby find for $5! Also, you can see the super cute and easy lamp shades I recovered.


The rug was also found on clearance at Kmart, but can't remember the price. I think $13 or something like that.


Here is the room looking at the front door of the room. This is a better view of the fan, which I would have loved to switch out! 

Here is the after. I really wanted to change out the fan in this room to a chandelier of some sort, but I made my husband a promise that anything done to this house would be paint only since we plan on building a new one in a few years. I did, however, update the scones to look less dated than the previous tulips.

The changing table and dresser area.


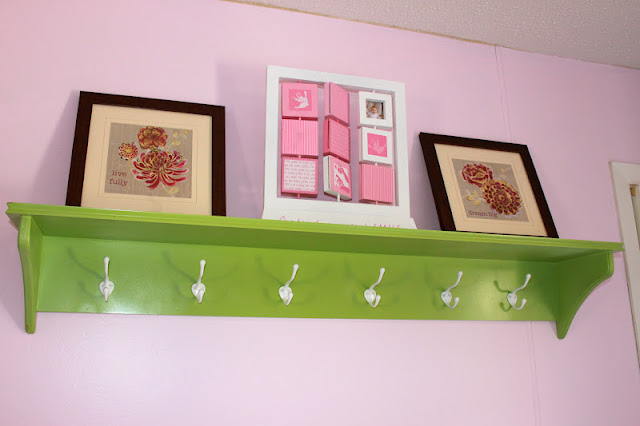
My awesome garage sale find of a $2 shelf that I repainted. (See blog DIY: The $2 Shelf Redo)


This is the before view of our closet. I hated these closet doors! There was no bottom track, so they smash your fingers very easily and slide off their top track which is super annoying to get back on. 

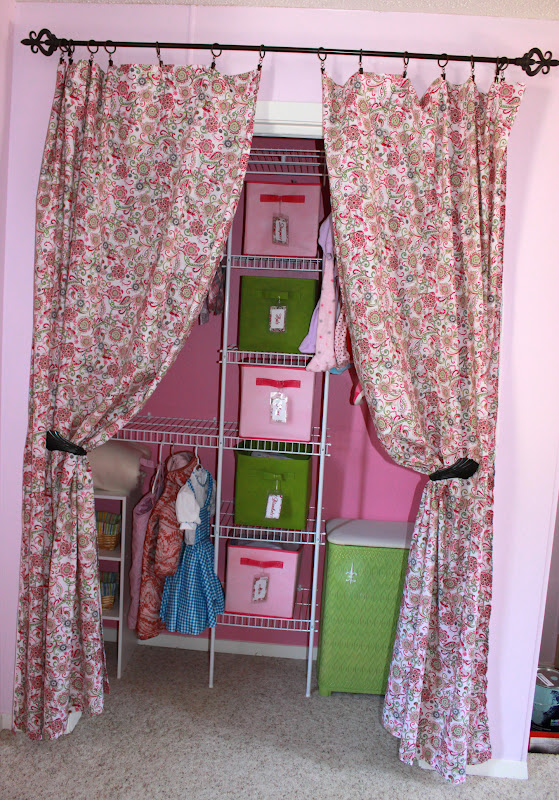
Here is the after view of the closet. I sewed the curtains and hung curtain tie-backs, which I re-purposed from the previous window treatments in the room. (They were gold and holding the swag curtains in the middle.)

I also installed a closet organizer to help keep the closet looking cleaner. The hamper actually belonged to a relative of my husbands and use to be cream colored. I spray painted it green to add some more green to the room.

I am obviously in love with my Super Easy Basket Tags. They are just another way to keep the closet organized. 

If you can't tell....I have hit quite a few garage sales, so I think she is set on the clothes!!! 

Well that is the final nursery! Here is the before and after:

I am happy to have it finished and really liked the way it turned out! I think at some point in the future I will need to devise some sort of book storage in the room, but I have a few years for that...and maybe might have another house at that point too. We will see....


Like this post?


Like This?- Pin It!

 
Copyright 2009 between3sisters