Tuesday, August 21, 2012

The End of Grad School


Hello my lovelies! Once again, I thank you for your patience with my significant absence from the blog world.  One of the things I learned in my early twenties was that I have to know my stopping point.  As many people will say from time to time, "I finally hit a wall!"  Let me tell you, working full time while attending grad school full time was certainly a recipe for repetitive wall hitting.  On top of it all I had it in my head that I wanted to finish with all A's so this obviously increased pressure to do well in my courses.  Despite all the restless nights, stress, and challenges of school, I finished my program in late July (with all A's!).  It still hasn't sunk in yet!  Part of what helped me power through the last few months was simply the thought of how many wonderful things I could do once I finished school.  I even started a Pinterest board focused on things I wanted to do after grad school.

It's funny how you miss the simple things when you are overloaded and consumed with school.  Here are a few things I added to my "happy list" of things to do...

Baking


Though I have no problem whipping up a yummy dinner for my hubby, I have never been much of a baker.  I've made cookies here and there but nothing fancy or really challenging.  Baking seems to be one of those things that isn't quite as intuitive for me so I would love to take a baking class and learn some great tips.  Though the more I think about it I could probably learn just as many amazing tips by spending more time with my Mom while she is baking. :)


Reading

As I child I LOVED to read.  I would spend many days lost in the pages of Nancy Drew and Anne of Green Gables.  As my studies and activities increased my reading went by the wayside.  It was silly but I felt that I spent so much time on school work I didn't want to read in my spare time.  It doesn't make sense, I know... but it's just how I felt.  I started to fall back in love with reading when I picked up the Twilight Saga (yes, please laugh at my nerdiness) and since then I've been finding so many books I've wanted to read.  While I did read books here and there throughout grad school, I am so happy to know that I can now devote more time to reading books for leisure and not for class.  I have SO many on my list!!!


Exercise

Once again, this is another thing that shouldn't have gone by the wayside during grad school.  But to be honest I'm not a morning person (I'd like to change that) and when I would get home from work I had to start my homework right away.  I'm looking forward to becoming a healthier version of myself.


More Dates!

Minneapolis Sculpture Garden

One of the hardest things about grad school was definitely a lack of time for each other.  My hubby and I both acknowledged that there were many times we just wanted some quality "us" time and we just couldn't fit it into our schedule.  There were many nights where it felt like we didn't see each other as he would spend all night in the one room while I would be studying in the other.  With this in mind I'm excited to try different local restaurants and attractions in our area and am looking forward to quality time with my darling husband.  


Well the list isn't very long but it's a great way to get started on enjoying my free time.  I'm looking forward to writing new posts about building or buying a home (ooh!) and all the wonderful happy times in our future.


~Christi

Thursday, August 16, 2012

Make Ahead Meals: White Baked Penne Pasta

I am starting a series of blogs for Make Ahead Meals that I am preparing before Baby 2.0 arrives. Every night when I make dinner, I am doubling the recipe and putting the second in the freezer. I am hoping that the prepared meals will help on those totally exhausted days when cooking sounds like no fun. I am hoping many of the meals I will be preparing will be somewhat healthy and low calorie, but I know there will be some meals mixed in that aren't. To prepare for the freezer meals, I purchased some slow cooker liners (for the crockpot meals), gallon freezer bags (for the freezer skillet meals), and Aluminum Foil Steam Table Pans with matching lids (for the freezer casseroles).

White Baked Penne Pasta
This is an example of a NOT healthy meal. I ran across the original recipe for Baked Ziti and Sausage Recipe at Taste of Home, and didn't realize how sooo not good for you this recipe was for you! It's loaded with lots of cheese and pasta, which might be why it turned out really good! I of course, changed the recipe from the original-- used whole wheat penne pasta, added some different things, and amounts of ingredients from the original. I doubled the recipe and cooked one in a casserole dish for dinner and put the other in the freezer pan for next month. We really liked this recipe and can't wait to have it again! 

6 cups uncooked whole wheat penne pasta
5 chicken brat sausage links (I used chicken and asiago cheese.)
1/2 cup butter, cubed
1/2 cup all-purpose flour
2 cups skim milk
2 cups whole milk
2 cups grated Parmesan cheese
2 egg, lightly beaten
4 cups (16 ounces) 2% cottage cheese
2 tablespoon minced fresh parsley
2 cup (4 ounces) shredded part-skim mozzarella cheese
4 tablespoons of red pepper flakes, depending how spicy you like it
2 tablespoons of Paprika
salt and pepper

1. Cook pasta until al dente. Drain and put in a large bowl.
2. Cook the sausage according to directions. Mine were already precooked so it's just a matter of heating them up. Once cooked, sliced them into 1/2 pieces.  
3. In a large saucepan, melt butter. Stir in the flour, salt and pepper. Don't over salt, there is a lot of cheese in this recipe which will add enough salt for you.
4. When you rue is made, gradually add in milk and bring to a boil. Cook for a few minutes until milk is thickened and stir often until thick.
5. Stir in 1 cup of Parmesan cheese.
6. Pour milk mixture over pasta in large bowl and stir to combine.
7. In separate bowl-- combine egg, cottage cheese, parsley, and remaining Parmesan cheese. Again salt and pepper.

This part of the recipe, we will divide the ingredients into two dishes-- one for the oven for dinner, one for the freezer.
8. Grease a 2 1/2 quart casserole dish (or a dish a smaller then a 9x13 pan) and grease a aluminum foil steam table pan for the freezer.
9. Spoon 1/4 of the pasta/milk mixture into each pan. Add sausage to remaining pasta mixture in bowl and stir.
10. Top each pan with half of the cottage cheese mixture.
11. Sprinkle each pan evenly with red pepper flakes.
12. Divide the rest of the sausage/pasta mixture into both pans.
13. Sprinkle 1 cup of mozzarella cheese on each pan and sprinkle paprika on the top.
14. If you plan on eating the dinner that night-- Bake,  uncovered, at 350° for 30-35 minutes or until a thermometer reads 160°.
15. For the freezer casserole, cover with tin foil and matching pan lid. The two layers will keep the casserole from getting freezer burn. Write the following directions on the pan lid:
Date
Thaw, bake uncovered at 350° for 30-35 minutes, until 160° in center


Like this post?

Tuesday, August 7, 2012

Baby 2.0: The Nursery Reveal

The big nursery reveal day is finally here!! It's officially 6 weeks until we can expect to see the face of our little girl! In May, we found out our second child was going to be a girl and I started scheming ideas for the girl nursery (see post here). I believe, after months of work, I am finished with the nursery-- minus any little items I might find after this post to help decorate the room. Also, as for baby 2.0 projects, this should be one of the last posts on the subject until she arrives...should be, but might not be. (To see more posts about Baby 2.0 you can click here.)

This room is located in the front of our house and our largest bedroom. Like the rest of our house, it was a very dated 1978 room. Complete with the swag window treatments, plastic blinds, and dated ceiling fan. We have used this room as our guest room and basically our overall storage room. 

I really wanted to keep a queen bed in the room for me to crash in on those nights when she is having trouble sleeping. I had a bed in the room with Aiden and LOVED it! Also, my husband appreciates the quiet when he is trying to sleep and the less disruption of me getting in and out of bed. 

I went for a pink and green color scheme to the room and wanted to add in some trees to the design. This is what it looked like when you walk into the room before: 

This is now what the room looks like:

I painted wide stripes on one wall to create a little depth to the space and I painted the trees on the wall for some nice contrast to the pink. The trees look black, but they are really brown. The day I took the pictures it was just really hard to get the lighting right, so sorry the trees look black.

A view of the other side of the room.

And the after.


A closer look at the crib, rocker and other side of the room. You can see half a clock, which was a clearance hobby lobby find for $5! Also, you can see the super cute and easy lamp shades I recovered.


The rug was also found on clearance at Kmart, but can't remember the price. I think $13 or something like that.


Here is the room looking at the front door of the room. This is a better view of the fan, which I would have loved to switch out! 

Here is the after. I really wanted to change out the fan in this room to a chandelier of some sort, but I made my husband a promise that anything done to this house would be paint only since we plan on building a new one in a few years. I did, however, update the scones to look less dated than the previous tulips.

The changing table and dresser area.


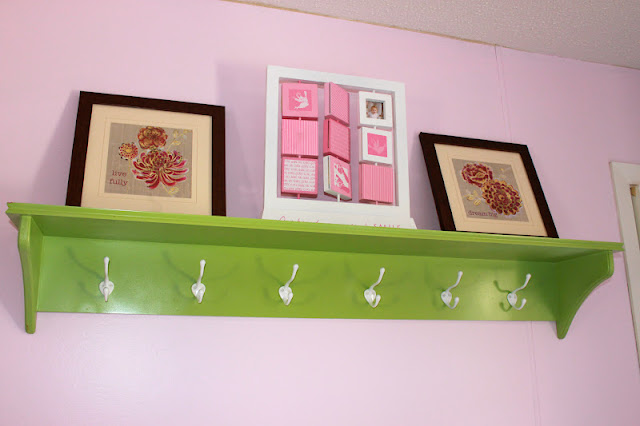
My awesome garage sale find of a $2 shelf that I repainted. (See blog DIY: The $2 Shelf Redo)


This is the before view of our closet. I hated these closet doors! There was no bottom track, so they smash your fingers very easily and slide off their top track which is super annoying to get back on. 

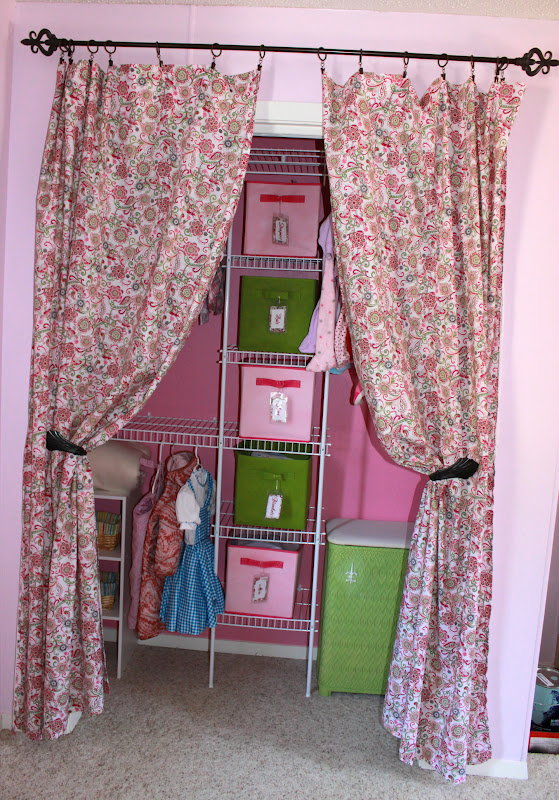
Here is the after view of the closet. I sewed the curtains and hung curtain tie-backs, which I re-purposed from the previous window treatments in the room. (They were gold and holding the swag curtains in the middle.)

I also installed a closet organizer to help keep the closet looking cleaner. The hamper actually belonged to a relative of my husbands and use to be cream colored. I spray painted it green to add some more green to the room.

I am obviously in love with my Super Easy Basket Tags. They are just another way to keep the closet organized. 

If you can't tell....I have hit quite a few garage sales, so I think she is set on the clothes!!! 

Well that is the final nursery! Here is the before and after:

I am happy to have it finished and really liked the way it turned out! I think at some point in the future I will need to devise some sort of book storage in the room, but I have a few years for that...and maybe might have another house at that point too. We will see....


Like this post?


Sunday, August 5, 2012

DIY: Easy Nursing Pillow Cover (No Zippers)

I know I promised that the next post on the nursery would be the reveal of the finished product, but I did this very short DIY yesterday and decided it would be nice to share. Really this isn't part of the nursery, more of an item I will use in the nursery. Here's the story of the super large nursing pillow:

This is not a Boppy Pillow. I have a Boppy Pillow but I let my Mom borrow it for some kids she watches during the day. Well, she was in need of another one since I will be needing mine back in 7 weeks and I ran across this nursing pillow at a garage sale for $10. It is HUGE!! About 23"x24" in size. It may not look that big in the photos, but trust me it is.

It was basically brand new, but had no cover on it. I think whoever it belonged to at first probably never had a cover so never used it. I brought it home and washed it, planning on giving it to my Mom so I could get my other pillow back. However, I decided to see if I liked this pillow better....and I did! I always thought the way my Boppy Pillow fit on me, just didn't fit with my rocking chair size. I really didn't use it that much. This thing, being really large, works great with my large rocking chair. 

I decided to keep it, but needed a cover for it. I looked all over the internet for a pillow of this size and still didn't find one. It's not homemade, it has tags that it was made in Mexico but no other markings on it. I decided I needed to make the cover myself. 

Now I am not a sewing expert, so this was a large task for me. I mean I made several things in high school (a dress, a blanket that folded into a pillows, stuffed animals) but honestly I have forgotten most of my sewing skills. I usually just fake it the best I can.

I started by tracing the shape of this pillow on some butcher paper to make a pattern.

I cut out the pattern and placed it on some extra material I had from the curtains.  

I pinned it in place and cut out the material to be about an inch larger then the pattern. (In hindsight, I probably would have cut the material to be 2 inches larger then the pattern, but my pillow is fat!) 

I don't remember how to do zippers and honestly didn't want to deal with them, so I decided to make a cover that has a sort of "pocket" that the pillow can go into. To do this I needed to cut the other side of the pillow into two pieces that for sure would overlap. For ease of following this DIY, I will call this the overlap side.

I took each piece of the overlap size and stitched the opening back 1 inch to make it appear more finished.  

When done you will be left with two pieces, with a nicely sewn finished opening for the pillow: 

Take your first overlap side (the side you want to show on the outside when finished) and pin it to the front side of the pillow. The colored sides of the materials should be facing each other. 

Pin these two sides together. If one side happens to be slightly larger then the other, no big deal. Just make sure the edges touch and let the material gap in the center. It will help with the fluffiness of your pillow. 

Sew the sides together. (Just a note-- Because you will be sliding your pillow in and out of this opening I triple reinforced my stitching on the opening to prevent ripping it out when fitting the pillow in.)

 Pin on your next overlap side of the pillow. Make sure the two overlap side pieces do in fact overlap.

Sew the second overlap side on and you will end up with a cover that looks like this:

Turn the cover right side out.

 You should have a nice little overlap that you can squish your pillow into.

I would be lying if I said it was super easy to slide my pillow in. This pillow was so fat I probably should have cut the material to be 2 inches larger then the pattern, but it still worked just fine!

That is it! The super easy nursing pillow cover that can fit any nursing pillow! It took me about 30 minutes to make this pillow cover and if you are an expert in sewing it will probably take you less time! I can't wait to use it!

Happy sewing!!


Like this post?

Friday, August 3, 2012

The Joys of Toddlerhood: The Food Battle Part 2

This blog has been long overdo. I wrote the first part of this blog over a month ago and sort of forgot that I was planning on writing a second half just showcasing some the standard foods I keep around the house for him to snack on.


In a short summary of the first blog, I don't fight our child on the food he eats. He gets a small amount of several foods for each meal and I let him pick and choose what he eats. It has seemed to work out pretty well for us. With that said, there are some "standard" foods I like to keep around the house for him. I am not a 'my child only eats organic' type of person, but I do try to provide healthy items for him around the house. For meals, he usually eats what we eat, but with a toddler it is helpful to have some snack items on hand for him.


Here is my list of my top 10 snack items that I like to keep around the house. Most of them are packaged for convenience, but then again, it makes my life easier so I am all about that! 


1. Bananas


Not only do bananas provide a bunch of vitamins for him, they are the easiest fruit to keep around the house and carry with us. He loves bananas and eats almost one a morning. 


2. Fruit Bits


I am somewhat obsessed with dried fruit, and when I found this prepackaged product of already cut up dried fruit. I fell in LOVE! I don't buy him fruit snacks, but these tasty little treats make a good substitute. 

3. Yoplait GoGurt

Again, if you can't tell, I like convenience items and GoGurts are such an easy way to give my kid yogurt without him ending up with a yogurt facial. These hand little tubes are perfect for him to squeeze into his mouth and enjoy with minimal mess. 

4. Turkey Hot Dogs

What toddler meal plan wouldn't be complete without hot dogs? Trying to keep the hot dogs somewhat healthier, we have opted for turkey and he really doesn't know the difference. These are pretty good hot dogs and a great quick meal and snack on those busy days. 

5. String Cheese

Yes, another prepackaged treasure, but in our defense we eat these awesome string cheese sticks as much as he does. It's a great way to add some calcium into his diet, easy to serve up, and super yummy!

6. Hummus

Whether it's homemade or store bought, it's a great protein packed dip to keep on hand for him. He actually will eat hummus on cucumbers, carrots, or pretzel chips. He loves the stuff and finds it really fun to dip items into the stuff. 

7. Turkey Pepperoni

This was one of those items that I discovered he liked on accident. I was making homemade pizza and gave him a few of these to snack on while I was cooking. He loves these things! I know it's strange, but my son is meat eater! He will gladly yell "MEAT" when he chews up any type of meat. With these being made from turkey they are quit a bit better for you then the standard pepperoni and go great with some cheese and crackers for him. 


8. Pretzel Crisps

Aiden started out like most kids and LOVED Goldfish crackers, but quickly became tired of them. However, he really loves these Pretzel Crisps and has not tired of them yet. They make them in a few varieties and he likes all of them so far. He likes them plain or dipped in hummus or spread with Laughing Cow cheese. Really, I haven't found a way he doesn't like these crisps!

9. GoGo Squeeze Apple Sauce


Talk about the easiest way to feed your kiddo on the go! Aiden loves these prepackaged applesauces and they are 100% fruit. He also doesn't make a mess with them which is great for me!

10. Peanut Butter

My last item on the list and probably a "no no" for many parents out there....peanut butter. My child doesn't have any allergies to peanut butter (and hoping my second doesn't either) because I highly believe that peanut butter can make everything better! We eat it on toast in the morning, with jelly for lunch, spread it on celery, or just eat it by the spoonful out of the jar. The ultimate snack for kids. I grew up with peanut butter (in fact the smell of peanut butter and coffee breath of my Mom is a very strong memory of mine) and I am sure that Aiden will remember how much his own mother enjoyed her peanut butter. 

Well, that was just some of the food items that I like to keep around the house for my toddler to snack on. I hope I added some ideas to your list and would love to hear from any of you who have found that you love!


Like this post?


Like This?- Pin It!

 
Copyright 2009 between3sisters